Difference between revisions of "ExamplesImplants/pt-br"
(Created page with "Como antes, o software mostra um lembrete e marca os itens a serem escaneados juntos à direita da janela, sob a visualização ao vivo.") |
(Updating to match new version of source page) |
||
| (31 intermediate revisions by one other user not shown) | |||
| Line 39: | Line 39: | ||
=== Etapa 1: Modelo Superior === | === Etapa 1: Modelo Superior === | ||
| + | <div class="mw-translate-fuzzy"> | ||
Uma vez que não existe um modelo oposto no projeto definido, o primeiro escaneamento necessário é o escaneamento do modelo superior, que será a referência para o posicionamento de todos os outros escaneamentos. <br /> Este passo é dividido em duas etapas secundárias. | Uma vez que não existe um modelo oposto no projeto definido, o primeiro escaneamento necessário é o escaneamento do modelo superior, que será a referência para o posicionamento de todos os outros escaneamentos. <br /> Este passo é dividido em duas etapas secundárias. | ||
| + | </div> | ||
=== Etapa de Escaneamento === | === Etapa de Escaneamento === | ||
| Line 45: | Line 47: | ||
Coloque o modelo superior no suporte do modelo e clique no botão '' 'Botão de Escaneamento''' {{Inline button|scanAction.png}}. | Coloque o modelo superior no suporte do modelo e clique no botão '' 'Botão de Escaneamento''' {{Inline button|scanAction.png}}. | ||
| + | <div class="mw-translate-fuzzy"> | ||
'' 'NESTA ETAPA, SOMENTE O MODELO DE GESSO É REQUERIDO. LEMBRE-SE DE TIRAR O MODELO GENGIVA, MARCADORES E QUALQUER OUTRO OBJETO ACESSÓRIO '' ' | '' 'NESTA ETAPA, SOMENTE O MODELO DE GESSO É REQUERIDO. LEMBRE-SE DE TIRAR O MODELO GENGIVA, MARCADORES E QUALQUER OUTRO OBJETO ACESSÓRIO '' ' | ||
| + | </div> | ||
Uma vez concluído o escaneamento, o resultado será mostrado. | Uma vez concluído o escaneamento, o resultado será mostrado. | ||
| Line 57: | Line 61: | ||
Esta etapa permite editar a imagem escaneada; para obter informações detalhadas sobre todas as opções disponíveis nesta etapa, visite a página [[Edit|Editar Ferramentas]]. | Esta etapa permite editar a imagem escaneada; para obter informações detalhadas sobre todas as opções disponíveis nesta etapa, visite a página [[Edit|Editar Ferramentas]]. | ||
| + | <div class="mw-translate-fuzzy"> | ||
A imagem nesta etapa pode ser editada ou aparada. Nesta fase, na verdade, é importante não editar muito a imagem ou cortar grandes partes de informações, pois tornaria mais difícil para o software calcular o alinhamento automático do objeto à sua referência. | A imagem nesta etapa pode ser editada ou aparada. Nesta fase, na verdade, é importante não editar muito a imagem ou cortar grandes partes de informações, pois tornaria mais difícil para o software calcular o alinhamento automático do objeto à sua referência. | ||
| + | </div> | ||
| + | <div class="mw-translate-fuzzy"> | ||
Aqui abaixo um exemplo sobre como cortar usando a ferramenta de base cortada e simplesmente clicando duas vezes na imagem para remover as partes indesejadas. | Aqui abaixo um exemplo sobre como cortar usando a ferramenta de base cortada e simplesmente clicando duas vezes na imagem para remover as partes indesejadas. | ||
| + | </div> | ||
[[File:edit-upper-implants.gif]] | [[File:edit-upper-implants.gif]] | ||
| Line 67: | Line 75: | ||
==Etapa 2: Marcadores== | ==Etapa 2: Marcadores== | ||
| + | <div class="mw-translate-fuzzy"> | ||
Esta etapa exige que o usuário escaneie os marcadores ou scanbodies que serão usados para marcar o posicionamento correto do canal de geometria e parafuso do implante no software de CAD. <br /> O escaneamento dos marcadores é dividida em etapas diferentes. | Esta etapa exige que o usuário escaneie os marcadores ou scanbodies que serão usados para marcar o posicionamento correto do canal de geometria e parafuso do implante no software de CAD. <br /> O escaneamento dos marcadores é dividida em etapas diferentes. | ||
| + | </div> | ||
=== Definição === | === Definição === | ||
| Line 99: | Line 109: | ||
{{Screenshot|align-13-23.png}} | {{Screenshot|align-13-23.png}} | ||
| − | ;Identificação do marcador: quando um grupo de escaneamento tem mais de um item, o usuário será solicitado a separar cada marcador dos outros para identificá-lo corretamente. <br /> Para saber mais sobre a identificação dos munhões visite o [[Scan | Scan Interface]]. | + | <div class="mw-translate-fuzzy"> |
| + | ;Identificação do marcador: quando um grupo de escaneamento tem mais de um item, o usuário será solicitado a separar cada marcador dos outros para identificá-lo corretamente. <br /> Para saber mais sobre a identificação dos munhões visite o [[Scan | Scan Interface]]. | ||
| + | </div> | ||
[[File: separate-23-13.gif]] | [[File: separate-23-13.gif]] | ||
| Line 111: | Line 123: | ||
Como antes, o software mostra um lembrete e marca os itens a serem escaneados juntos à direita da janela, sob a visualização ao vivo. | Como antes, o software mostra um lembrete e marca os itens a serem escaneados juntos à direita da janela, sob a visualização ao vivo. | ||
| − | + | Coloque o modelo com os marcadores selecionados no suporte do modelo e clique no botão '' 'Escanear' '' {{Inline button | scanAction.png}}. Uma vez concluído o escaneamento, o resultado será mostrado. | |
[[File:markers1525-steps.png]] | [[File:markers1525-steps.png]] | ||
| − | + | Clique em {{Inline button | proxAção.png}} para acessar a etapa de edição. | |
| − | ; | + | ; Editar: Esta imagem foi editada com a ferramenta de seleção poligonal; a ação de corte foi ativada no menu contextual. |
[[File:edit-15-25.gif]] | [[File:edit-15-25.gif]] | ||
| − | + | Clique em {{Inline button | proxAção.png}} para acessar a fase de alinhamento. | |
| − | + | <div class="mw-translate-fuzzy"> | |
| + | Alinhamento: o alinhamento para todos os itens escaneados é sempre automático e mostra os resultados após a etapa de edição. <br /> Para saber mais sobre o alinhamento automático e o procedimento manual, visite nossa página [[Align | Alinhamento Interface]]. | ||
| + | </div> | ||
{{Screenshot|align-15-25.png}} | {{Screenshot|align-15-25.png}} | ||
| − | + | <div class="mw-translate-fuzzy"> | |
| + | Identificação do marcador: quando um grupo de escaneamento tem mais de um item, o usuário será solicitado a separar cada marcador dos outros para identificá-lo corretamente. <br /> Para saber mais sobre a identificação das munhões visite o [[Scan | Scan Interface]]. | ||
| + | </div> | ||
[[File: separate-25-15.gif]] | [[File: separate-25-15.gif]] | ||
| − | + | Clique em {{Inline button | nextAction.png}} para continuar. | |
| − | == | + | ==Etapa 3: Gengiva== |
| − | + | Se no projeto tiver sido especificado a presença de uma gengiva de silicone, que pode ser separada do modelo, o software pedirá ao usuário para escaneá-lo em cima do modelo de referência. <br /> Também esta etapa se desenvolve em diferentes fases. | |
| − | === | + | === Etapa de Escaneamento === |
| − | + | Coloque o modelo superior com a gengiva no suporte do modelo e clique no botão '' 'Escanear' '' {{Inline button | scanAction.png}}. <br /> Depois que o escaneamento terminar, o resultado será mostrado. | |
[[File:gingiva-steps.png]] | [[File:gingiva-steps.png]] | ||
| − | + | Clique {{Inline button|nextAction.png}} para continuar. | |
| − | === | + | === Editar Etapa === |
| − | + | <div class="mw-translate-fuzzy"> | |
| + | Este item foi cortado usando a ferramenta de seleção retangular; a parte selecionada foi cancelada pressionando o botão DELETE (DEL) no teclado. | ||
| + | </div> | ||
| − | [[File:Edit- | + | [[File:Edit-gengiva.gif]] |
| − | + | Clique {{Inline button|nextAction.png}} para continuar. | |
| − | === | + | ===Alinhamento Automático=== |
| − | + | Como para os outros itens, a imagem da gengiva se alinha automaticamente à sua referência (o modelo superior). A parte do modelo que corresponde à referência será então removida automaticamente para manter apenas a parte real da gengiva no formato da mesh. | |
{{Screenshot|align-gingiva.png}} | {{Screenshot|align-gingiva.png}} | ||
| − | + | Clique {{Inline button|nextAction.png}} para continuar. | |
| − | == | + | == Etapa 4: Saudável e Pontes == |
| − | + | <div class="mw-translate-fuzzy"> | |
| + | Nesta fase, o projeto foi escaneado, a menos que o usuário deseje re-escanear os saudáveis e as pontes. Neste caso, uma vez que não há dentes saudáveis, não é necessário re-escanear . | ||
| + | </div> | ||
{{Screenshot|healthy-implants.PNG}} | {{Screenshot|healthy-implants.PNG}} | ||
| − | + | Clique em {{Inline button | nextAction.png}} para continuar. <br /> O software irá então propor uma etapa de edição adicional para permitir ao usuário modificar a imagem saudável. Prossiga no passo de edição como explicado anteriormente. | |
| − | == | + | ==Etapa 5: Marcador de Alinhamento== |
| − | + | <div class="mw-translate-fuzzy"> | |
| + | Para atender a sua finalidade, os marcadores precisam estar alinhados com uma "biblioteca de implantes": uma representação virtual, geométrica e precisa do scanbody que foi parafusada no analógico de gesso para marcar sua posição. <br /> O alinhamento à biblioteca pode ser realizado tanto no software de escaneamento como no Exocad. Como o mercado de bibliotecas e scanbodies é tão diversificado, é possível que algumas bibliotecas não funcionem no nosso sistema. | ||
| + | </div> | ||
| − | + | Aqui abaixo a seleção da biblioteca realizada para o nosso caso de demonstração: | |
[[File:select-library.gif]] | [[File:select-library.gif]] | ||
| − | + | Imediatamente após, o usuário será solicitado a alinhar o STL do marcador aos itens escaneados: | |
[[File:align_markers.gif]] | [[File:align_markers.gif]] | ||
| − | + | <div class="mw-translate-fuzzy"> | |
| + | Para saber mais sobre como selecionar uma biblioteca e alinhar os scanbodies, visite a seção '' 'Alinhamento do marcador' '' da página [[Align | Alignment Interface]]. | ||
| + | </div> | ||
| − | == | + | == Etapa 6: Geração e Exportação de Mesh == |
| − | + | <div class="mw-translate-fuzzy"> | |
| + | Neste ponto, o software inicia imediatamente a geração de mesh. As meshes podem ser editadas e exportadas individualmente ou como uma imagem única. Para saber mais sobre edição de mesh, visite nossa página [[Mesh | Mesh Ferramentas]]. | ||
| + | </div> | ||
| − | + | Clique no Botão Exportar {{Inline button | exportParaCadAção.png}} para exportar para o CAD. | |
{{Screenshot|mesh-implants.png}} | {{Screenshot|mesh-implants.png}} | ||
| − | + | <div class="mw-translate-fuzzy"> | |
| + | Se o projeto foi iniciado no Exocad, o CAD será aberto automaticamente e o projeto pode ser iniciado imediatamente. Caso contrário, o software irá perguntar ao usuário como exportar o arquivo | ||
| + | </div> | ||
{{Navigation|ExamplesCemented|ExamplesQuadrant}} | {{Navigation|ExamplesCemented|ExamplesQuadrant}} | ||
Latest revision as of 10:36, 2 May 2018
Nesta página será seguido e explicado o assistente para escanear 1 modelo com 4 implantes e partes de gengiva de silicone.
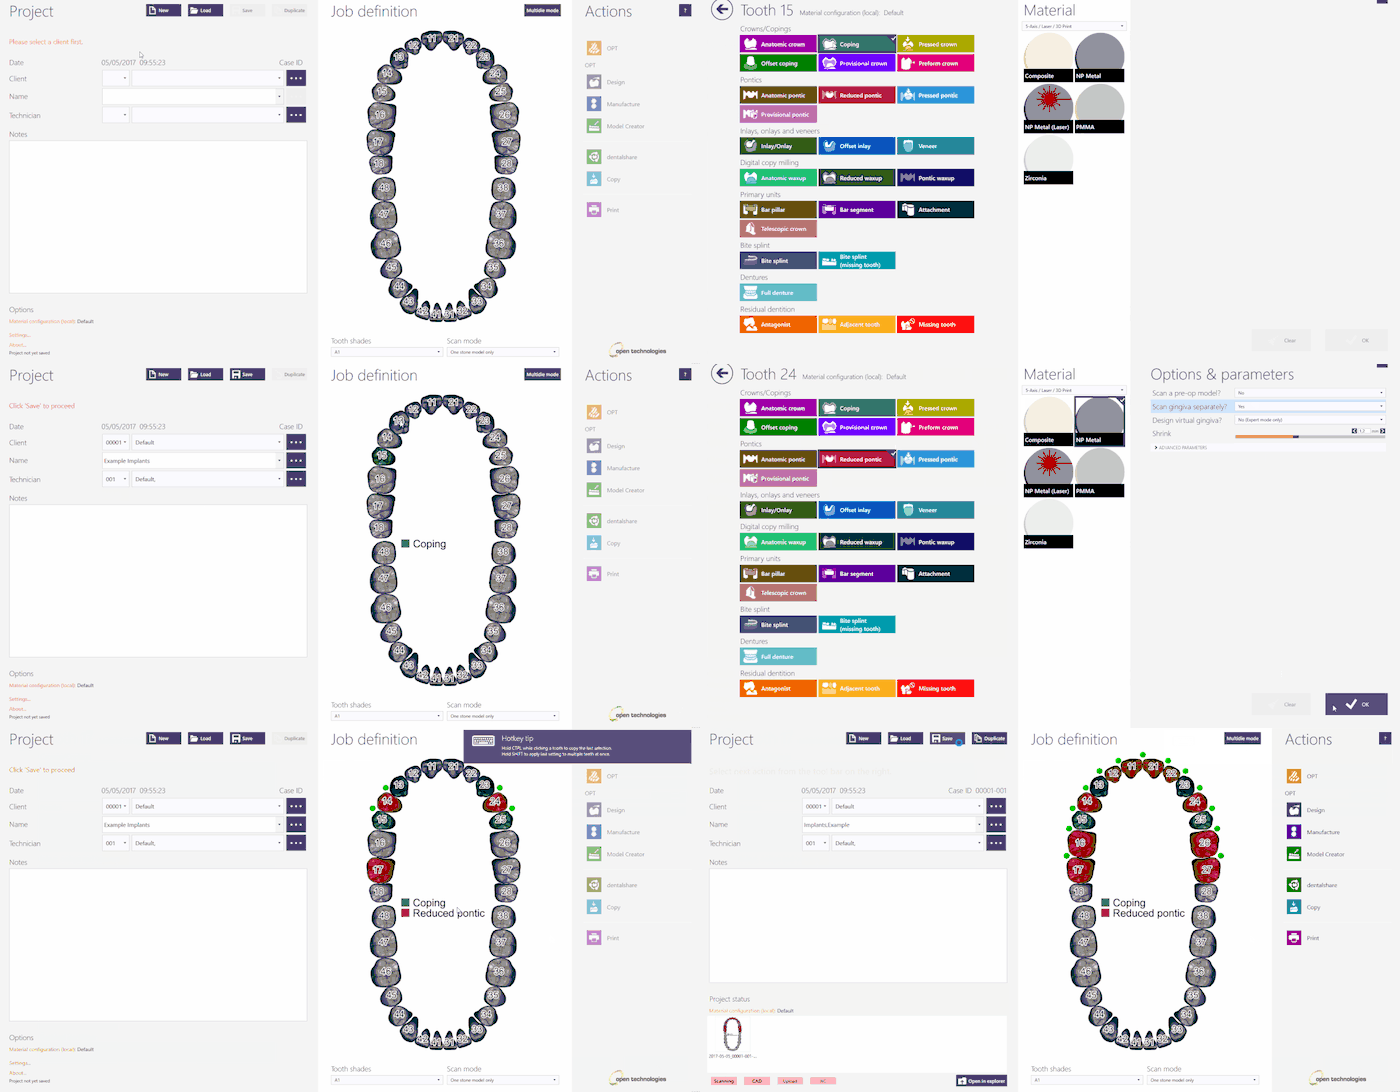
Para criar este projeto no Exocad, clique no ícone DentalDB na sua área de trabalho. O gerente do projeto será aberto.
Preencha as informações do projeto, o tipo de restauração que precisa ser projetado e os parâmetros extras. Para este tipo de projeto, certifique-se de que você selecionou o 'Tipo de Implante' e 'Gengiva Separada'
Para obter mais informações sobre como criar projetos no Exocad, visite a página específica no Exocad Wiki!
Aqui está a definição do projeto para o nosso projeto de demonstração:
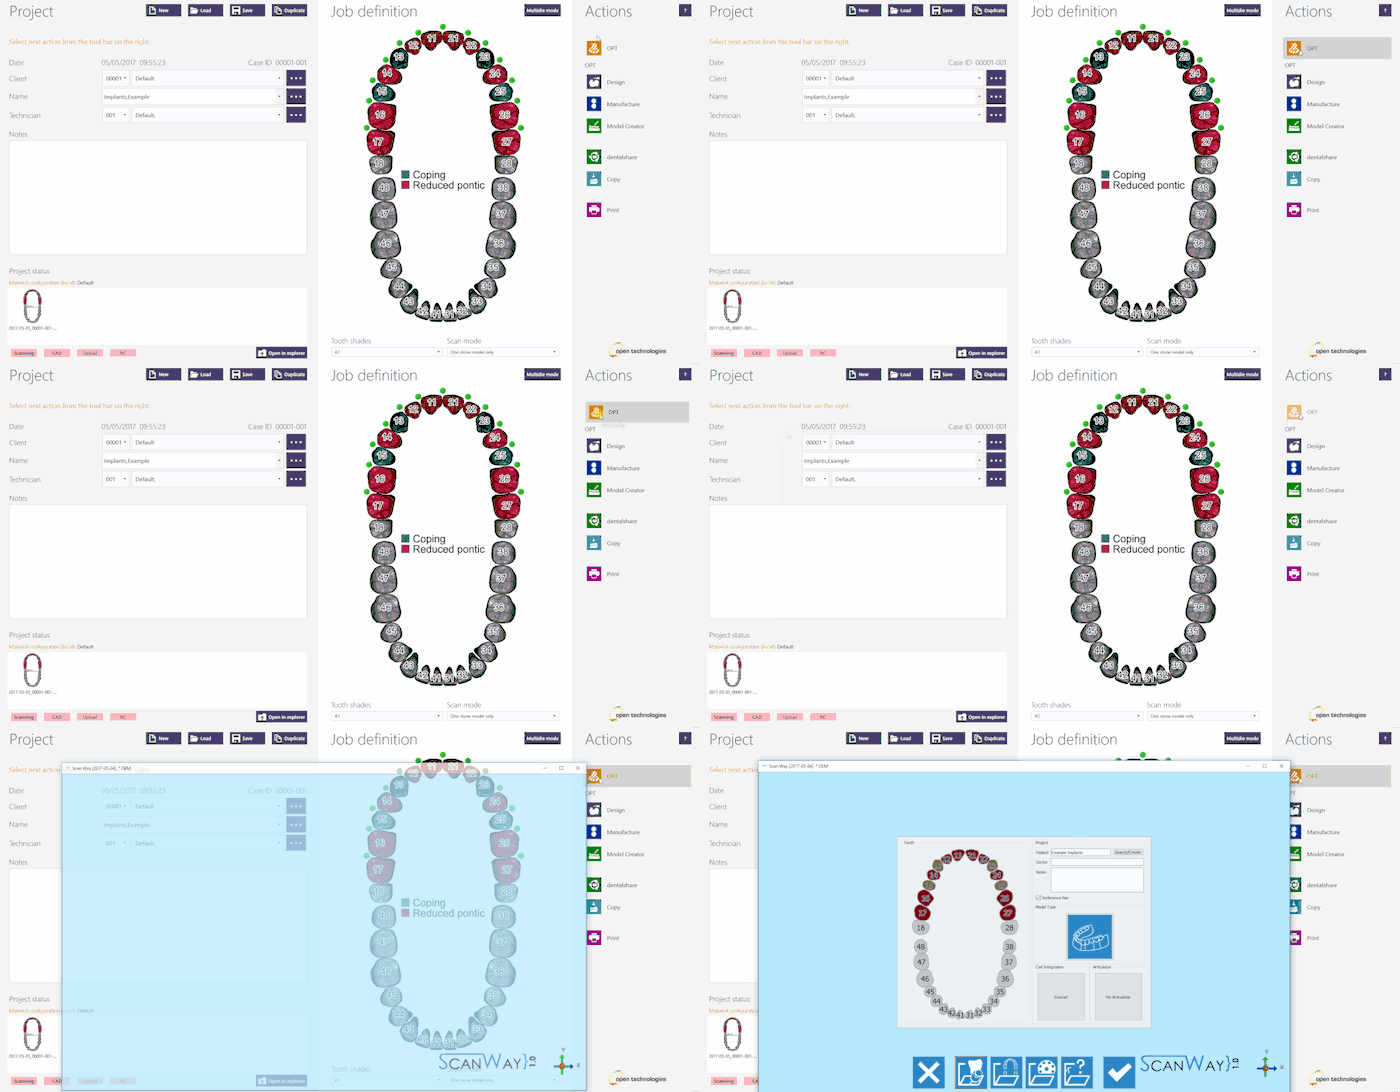
Uma vez definido o projeto, clique em 'OPT' na seção Ações para iniciar o software de escaneamento.
A primeira coisa que o software de escaneamento mostra é o projeto criado no Exocad, se o projeto estiver corretamente definido, clique no Botão Aceitar ![]() .
.
Contents
Definição do projeto a partir do ScanWay
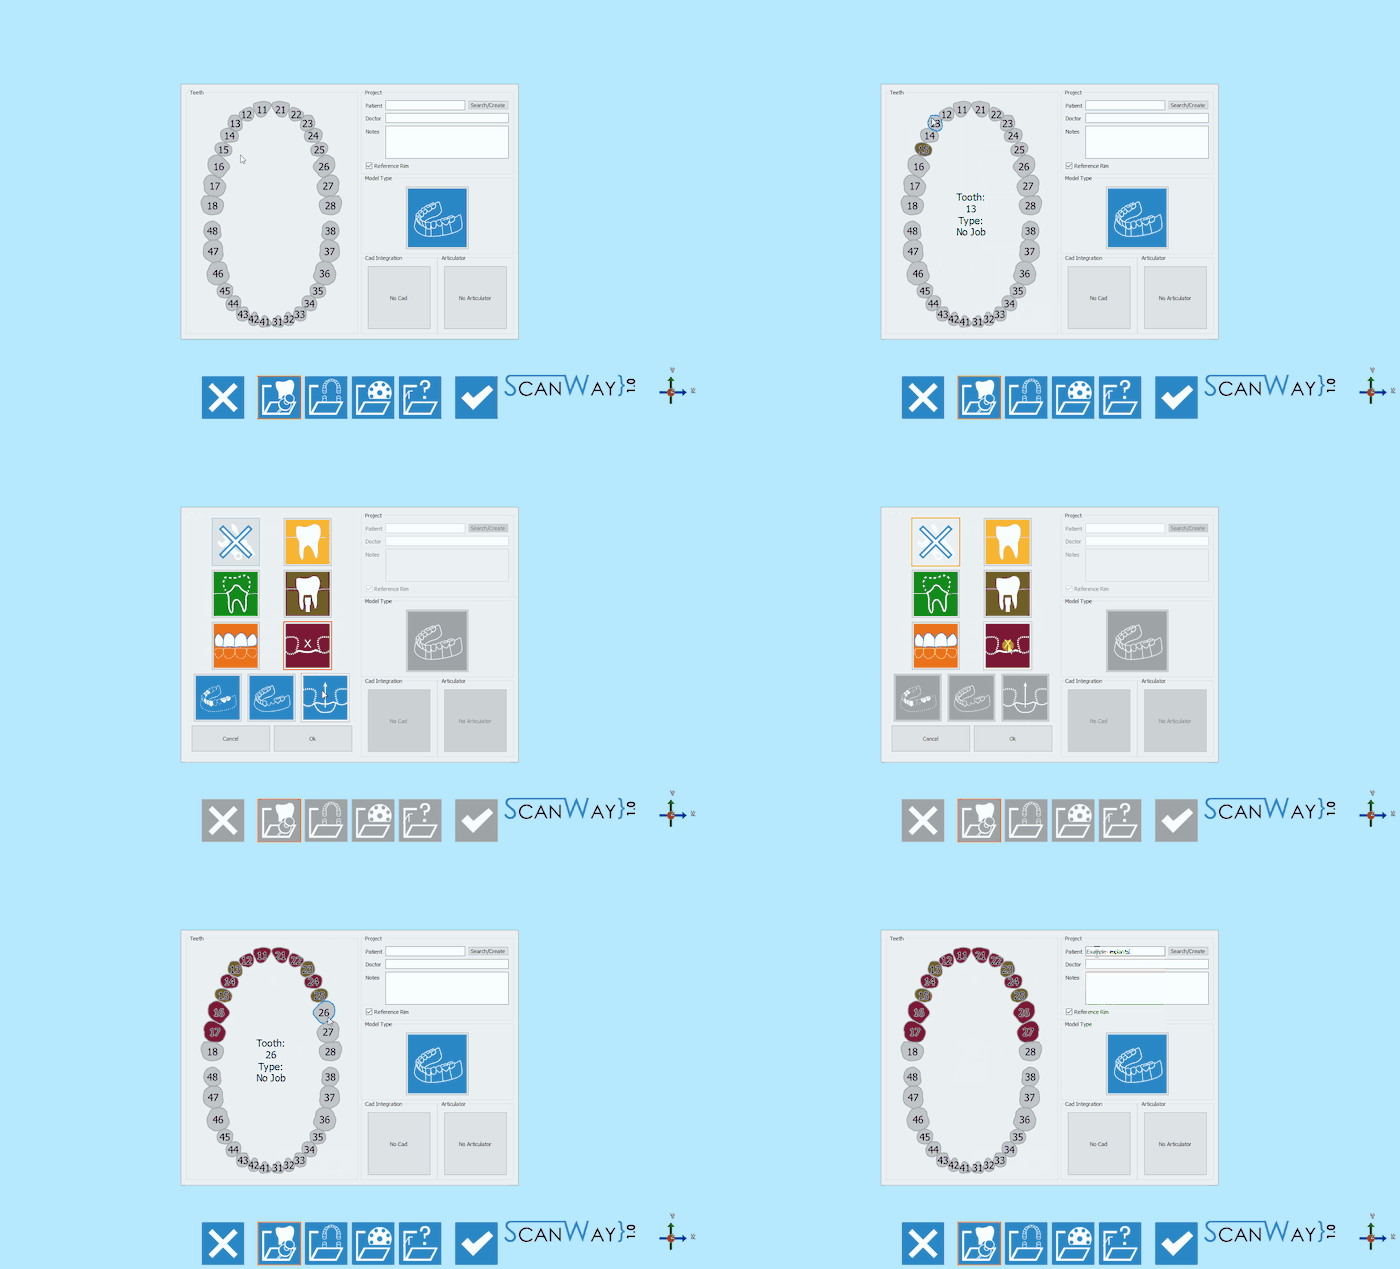
Todos os projetos também podem ser definidos no software de escaneamento, independentemente do CAD que mais tarde será usado para projetar.
Inicie o software de digitalização clicando duas vezes no ícone do ScanWay na sua área de trabalho. A Página de boas-vindas será aberta; Para criar o projeto, clique no primeiro ícone.
Para obter informações detalhadas sobre como definir um projeto, visite a página específica: Criar um novo projeto.
Aqui está a definição do nosso projeto de demonstração:
Ambas as definições de projeto descritas levam ao mesmo assistente, que agora será seguido passo a passo.
Etapa 1: Modelo Superior
Uma vez que não existe um modelo oposto no projeto definido, o primeiro escaneamento necessário é o escaneamento do modelo superior, que será a referência para o posicionamento de todos os outros escaneamentos.
Este passo é dividido em duas etapas secundárias.
Etapa de Escaneamento
Coloque o modelo superior no suporte do modelo e clique no botão 'Botão de Escaneamento' ![]() .
.
'NESTA ETAPA, SOMENTE O MODELO DE GESSO É REQUERIDO. LEMBRE-SE DE TIRAR O MODELO GENGIVA, MARCADORES E QUALQUER OUTRO OBJETO ACESSÓRIO '
Uma vez concluído o escaneamento, o resultado será mostrado.
Clique em x25px para acessar o passo de edição para o modelo superior.
Etapa Editar
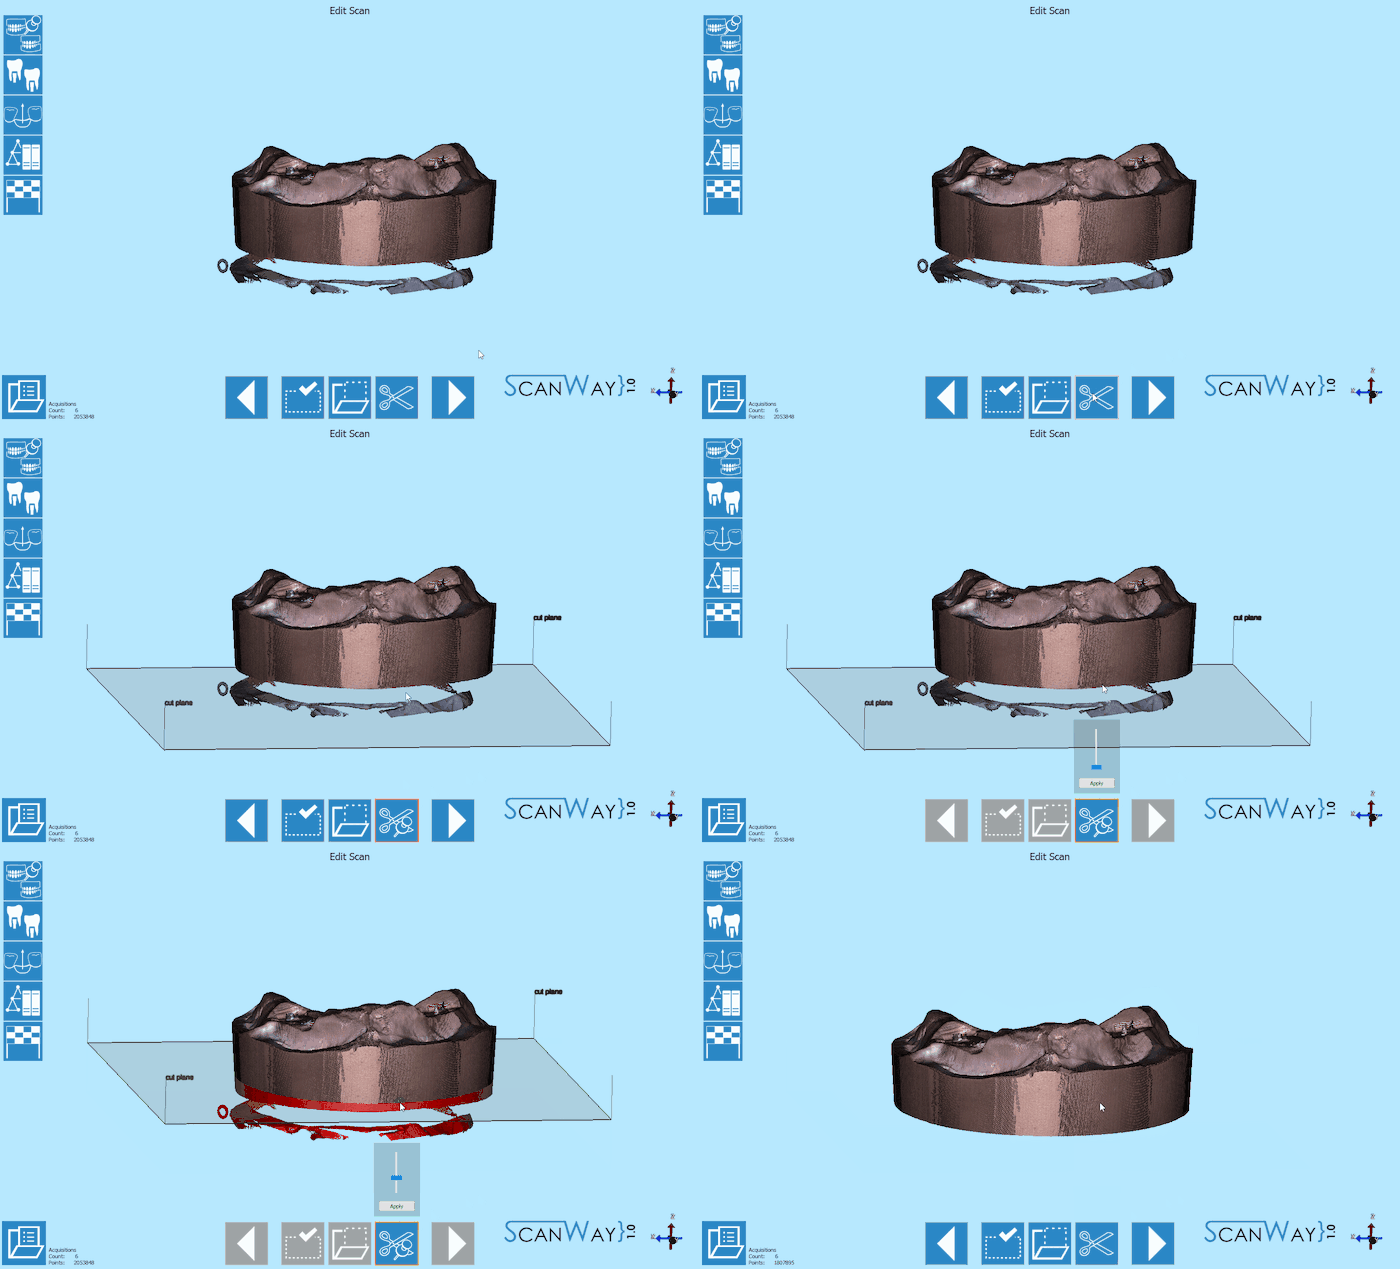
Esta etapa permite editar a imagem escaneada; para obter informações detalhadas sobre todas as opções disponíveis nesta etapa, visite a página Editar Ferramentas.
A imagem nesta etapa pode ser editada ou aparada. Nesta fase, na verdade, é importante não editar muito a imagem ou cortar grandes partes de informações, pois tornaria mais difícil para o software calcular o alinhamento automático do objeto à sua referência.
Aqui abaixo um exemplo sobre como cortar usando a ferramenta de base cortada e simplesmente clicando duas vezes na imagem para remover as partes indesejadas.
Quando estiver satisfeito com o resultado clique em x25px para acessar a próxima etapa do assistente.
Etapa 2: Marcadores
Esta etapa exige que o usuário escaneie os marcadores ou scanbodies que serão usados para marcar o posicionamento correto do canal de geometria e parafuso do implante no software de CAD.
O escaneamento dos marcadores é dividida em etapas diferentes.
Definição
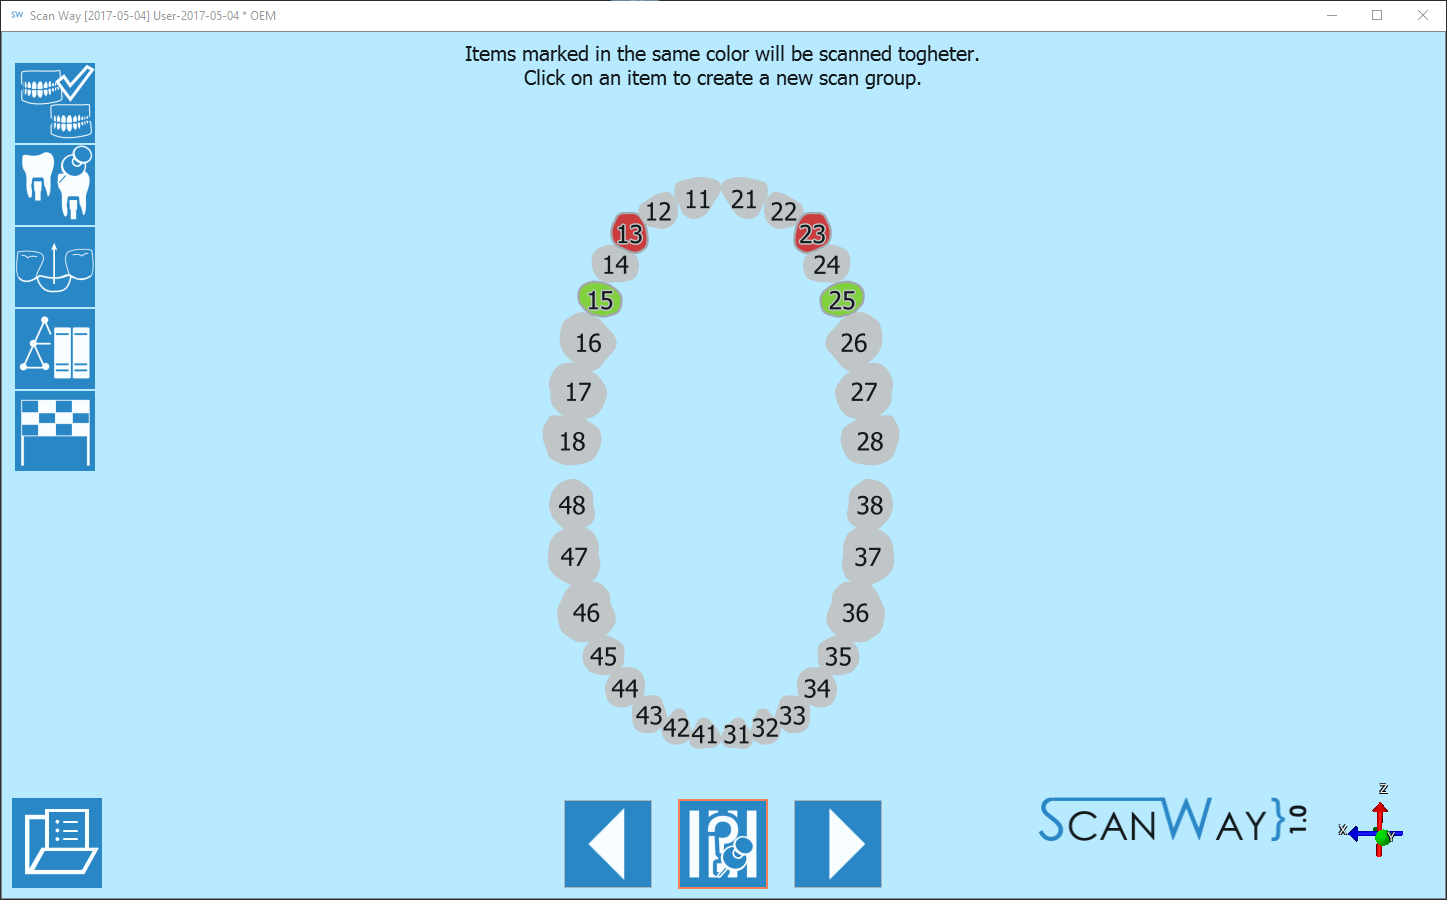
Não é necessário ter um marcador para cada implante no modelo, uma vez que os marcadores podem ser escaneados em diferentes grupos. Para demonstrar essa possibilidade, os 4 marcadores que precisam ser escaneados para este projeto foram divididos em dois grupos de escaneamento, da seguinte forma:
Clique em x25px para acessar o passo de escaneamento para o primeiro grupo.
Primeiro Grupo
- Escanear
- Dependendo do número de grupos de escaneamento criados, o software irá propor uma ou mais etapas de escaneamento.
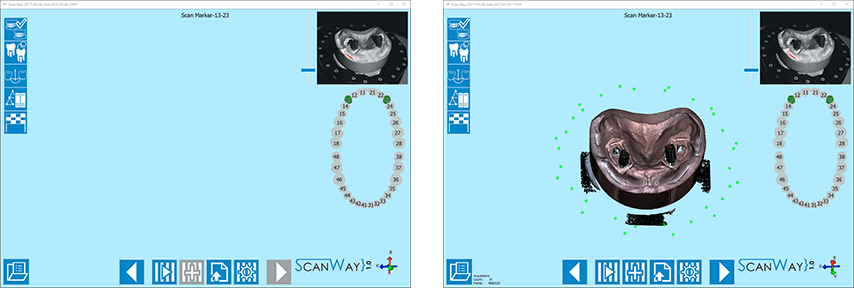
Primeiro, o software exige que o usuário insira os marcadores aparafusados no topo do modelo no escaner e adquira os itens do primeiro grupo.
Como lembrete, marca os itens a serem escaneados juntos à direita do janela, sob a visualização ao vivo.
Coloque o modelo com os marcadores selecionados no suporte do modelo e clique no botão 'Escanear' ![]() . Uma vez concluído o escaneamento, o resultado será mostrado.
. Uma vez concluído o escaneamento, o resultado será mostrado.
Clique em x25px para acessar a etapa de edição.
- Editar
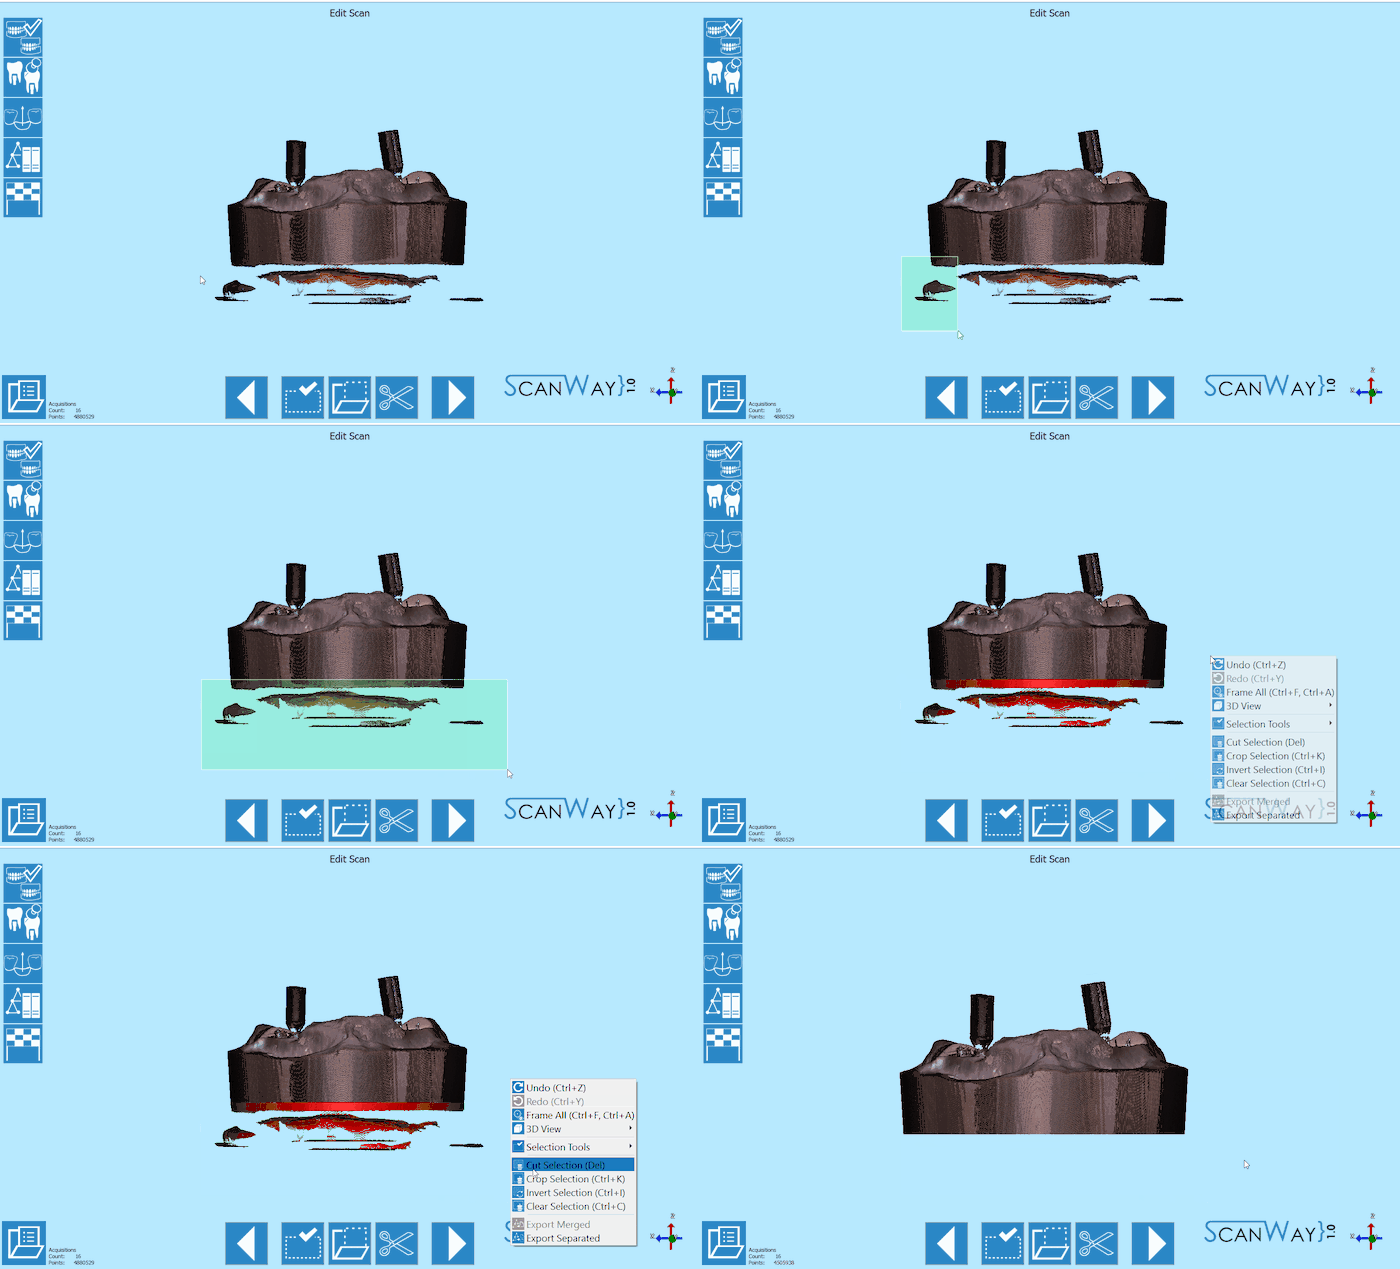
- siga a etapa de edição para limpar ou cortar a imagem. Desta vez, a ferramenta de seleção retangular foi usada e a ação de corte foi ativada no menu contextual.
Clique em x25px para acessar a fase de alinhamento.
- Alinhamento
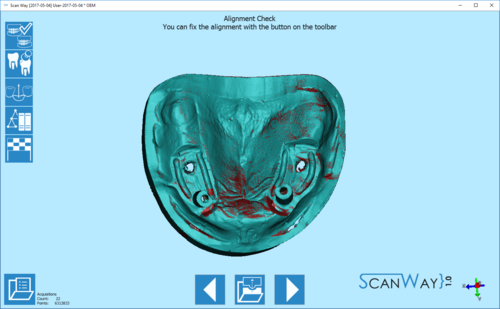
- o alinhamento para todos os itens escaneados é sempre automático e mostra os resultados após a etapa de edição.
Para saber mais sobre o alinhamento automático e o procedimento manual, visite nossa página Alinhamento Interface.
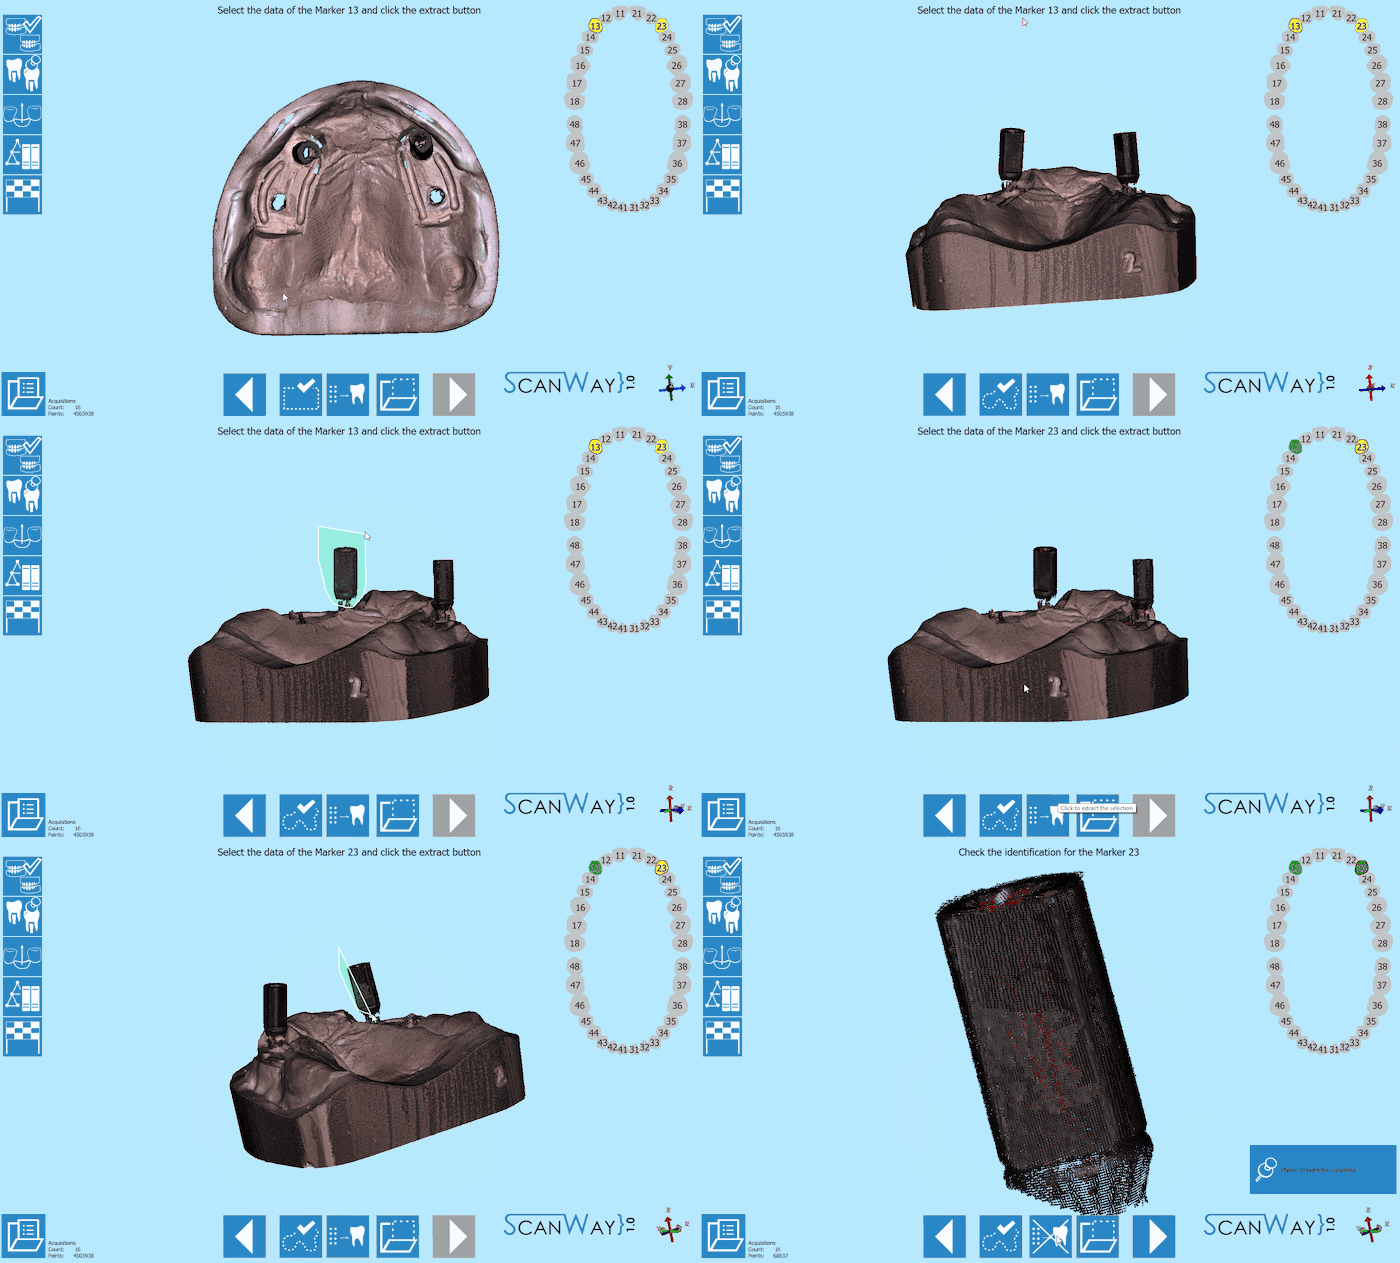
- Identificação do marcador
- quando um grupo de escaneamento tem mais de um item, o usuário será solicitado a separar cada marcador dos outros para identificá-lo corretamente.
Para saber mais sobre a identificação dos munhões visite o Scan Interface.
Segundo grupo
- Escanear
- Uma vez que no projeto os marcadores foram divididos em dois grupos, esta é a última verificação da etapa de escaneamento do marcador.
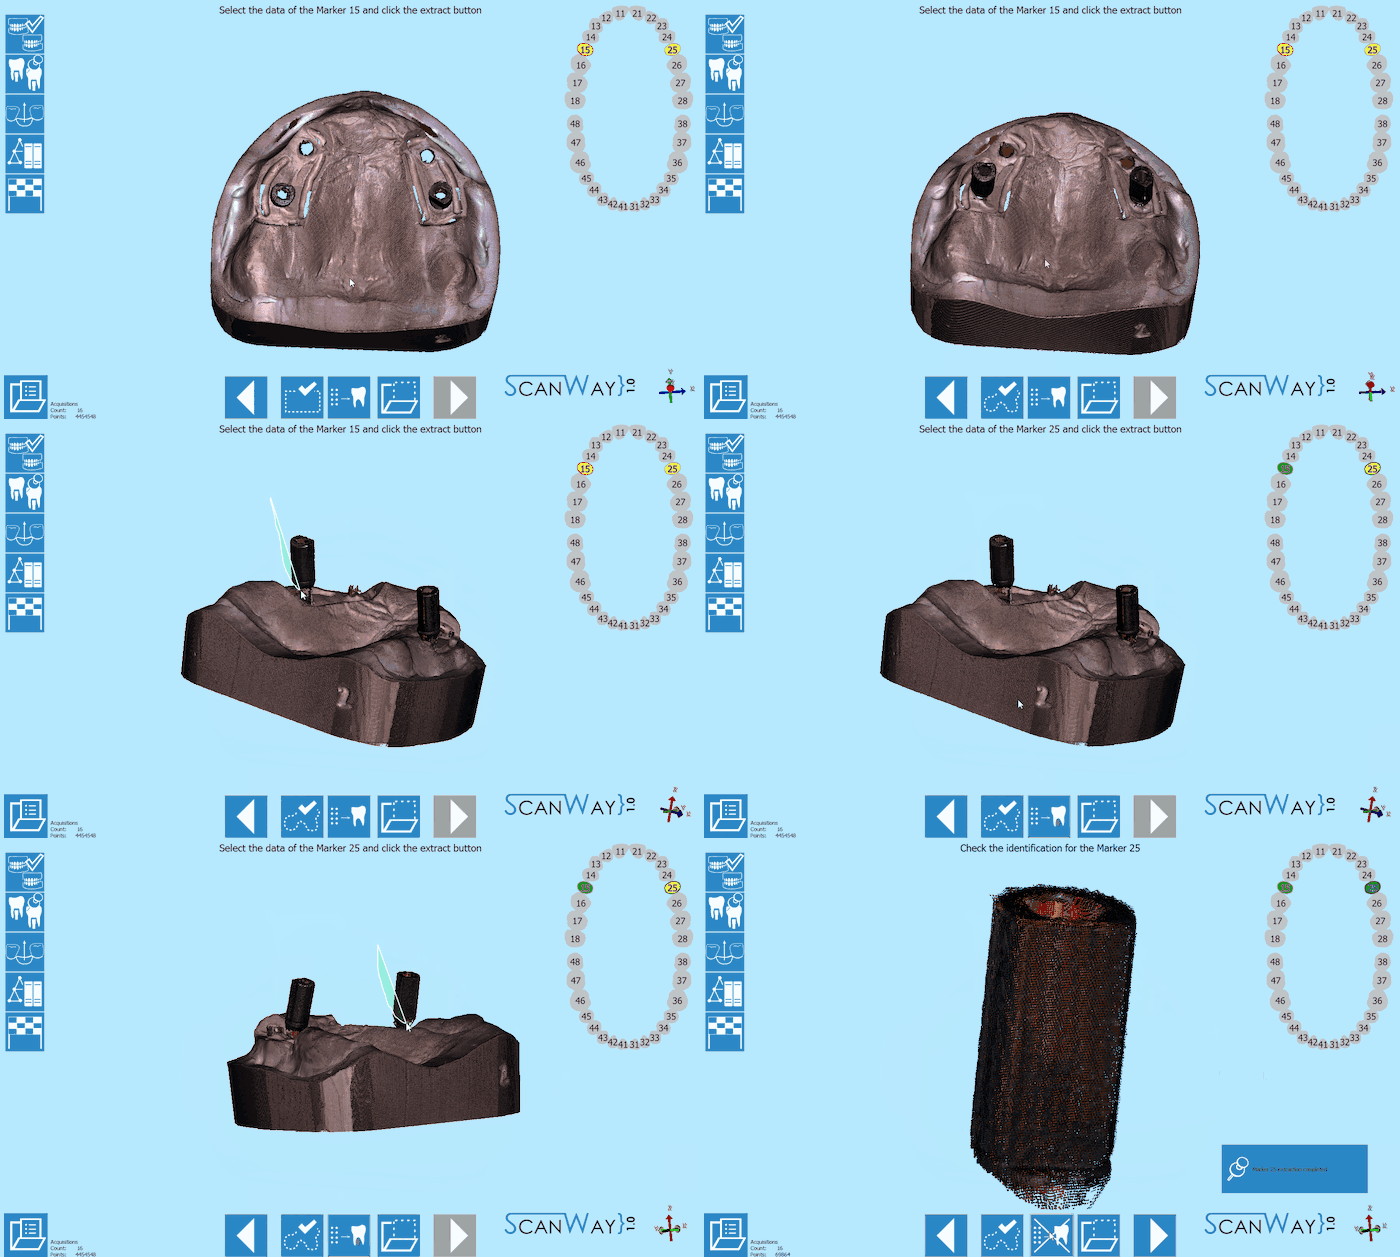
Como antes, o software mostra um lembrete e marca os itens a serem escaneados juntos à direita da janela, sob a visualização ao vivo.
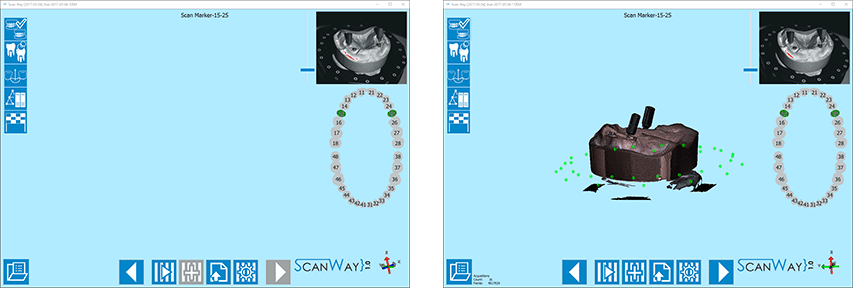
Coloque o modelo com os marcadores selecionados no suporte do modelo e clique no botão 'Escanear' ![]() . Uma vez concluído o escaneamento, o resultado será mostrado.
. Uma vez concluído o escaneamento, o resultado será mostrado.
Clique em x25px para acessar a etapa de edição.
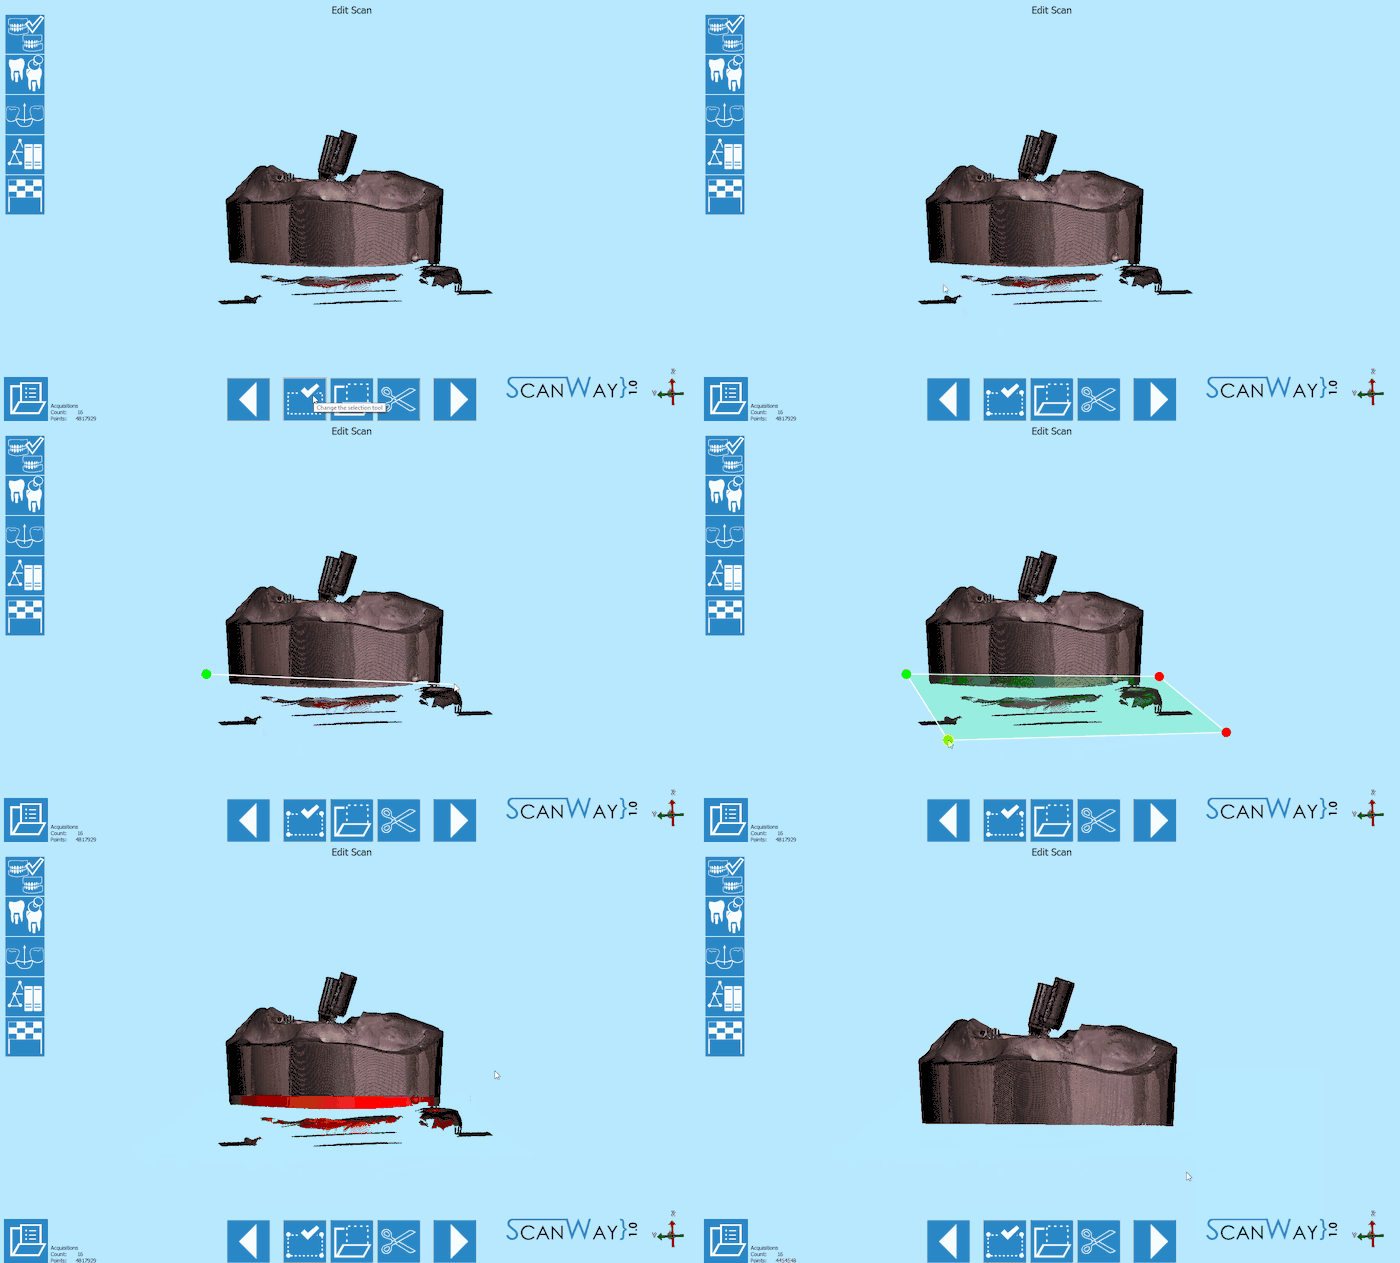
- Editar
- Esta imagem foi editada com a ferramenta de seleção poligonal; a ação de corte foi ativada no menu contextual.
Clique em x25px para acessar a fase de alinhamento.
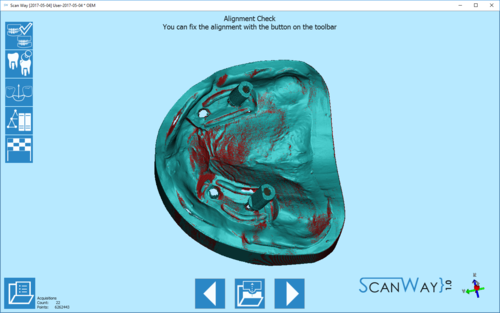
Alinhamento: o alinhamento para todos os itens escaneados é sempre automático e mostra os resultados após a etapa de edição.
Para saber mais sobre o alinhamento automático e o procedimento manual, visite nossa página Alinhamento Interface.
Identificação do marcador: quando um grupo de escaneamento tem mais de um item, o usuário será solicitado a separar cada marcador dos outros para identificá-lo corretamente.
Para saber mais sobre a identificação das munhões visite o Scan Interface.
Etapa 3: Gengiva
Se no projeto tiver sido especificado a presença de uma gengiva de silicone, que pode ser separada do modelo, o software pedirá ao usuário para escaneá-lo em cima do modelo de referência.
Também esta etapa se desenvolve em diferentes fases.
Etapa de Escaneamento
Coloque o modelo superior com a gengiva no suporte do modelo e clique no botão 'Escanear' ![]() .
.
Depois que o escaneamento terminar, o resultado será mostrado.
Editar Etapa
Este item foi cortado usando a ferramenta de seleção retangular; a parte selecionada foi cancelada pressionando o botão DELETE (DEL) no teclado.
Alinhamento Automático
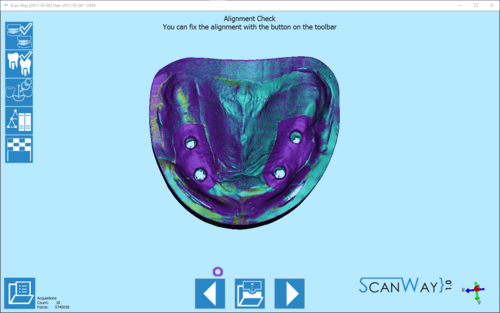
Como para os outros itens, a imagem da gengiva se alinha automaticamente à sua referência (o modelo superior). A parte do modelo que corresponde à referência será então removida automaticamente para manter apenas a parte real da gengiva no formato da mesh.
Etapa 4: Saudável e Pontes
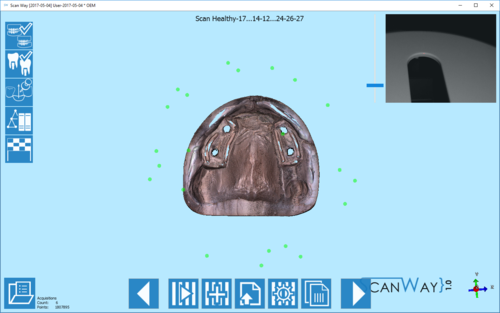
Nesta fase, o projeto foi escaneado, a menos que o usuário deseje re-escanear os saudáveis e as pontes. Neste caso, uma vez que não há dentes saudáveis, não é necessário re-escanear .
Clique em ![]() para continuar.
para continuar.
O software irá então propor uma etapa de edição adicional para permitir ao usuário modificar a imagem saudável. Prossiga no passo de edição como explicado anteriormente.
Etapa 5: Marcador de Alinhamento
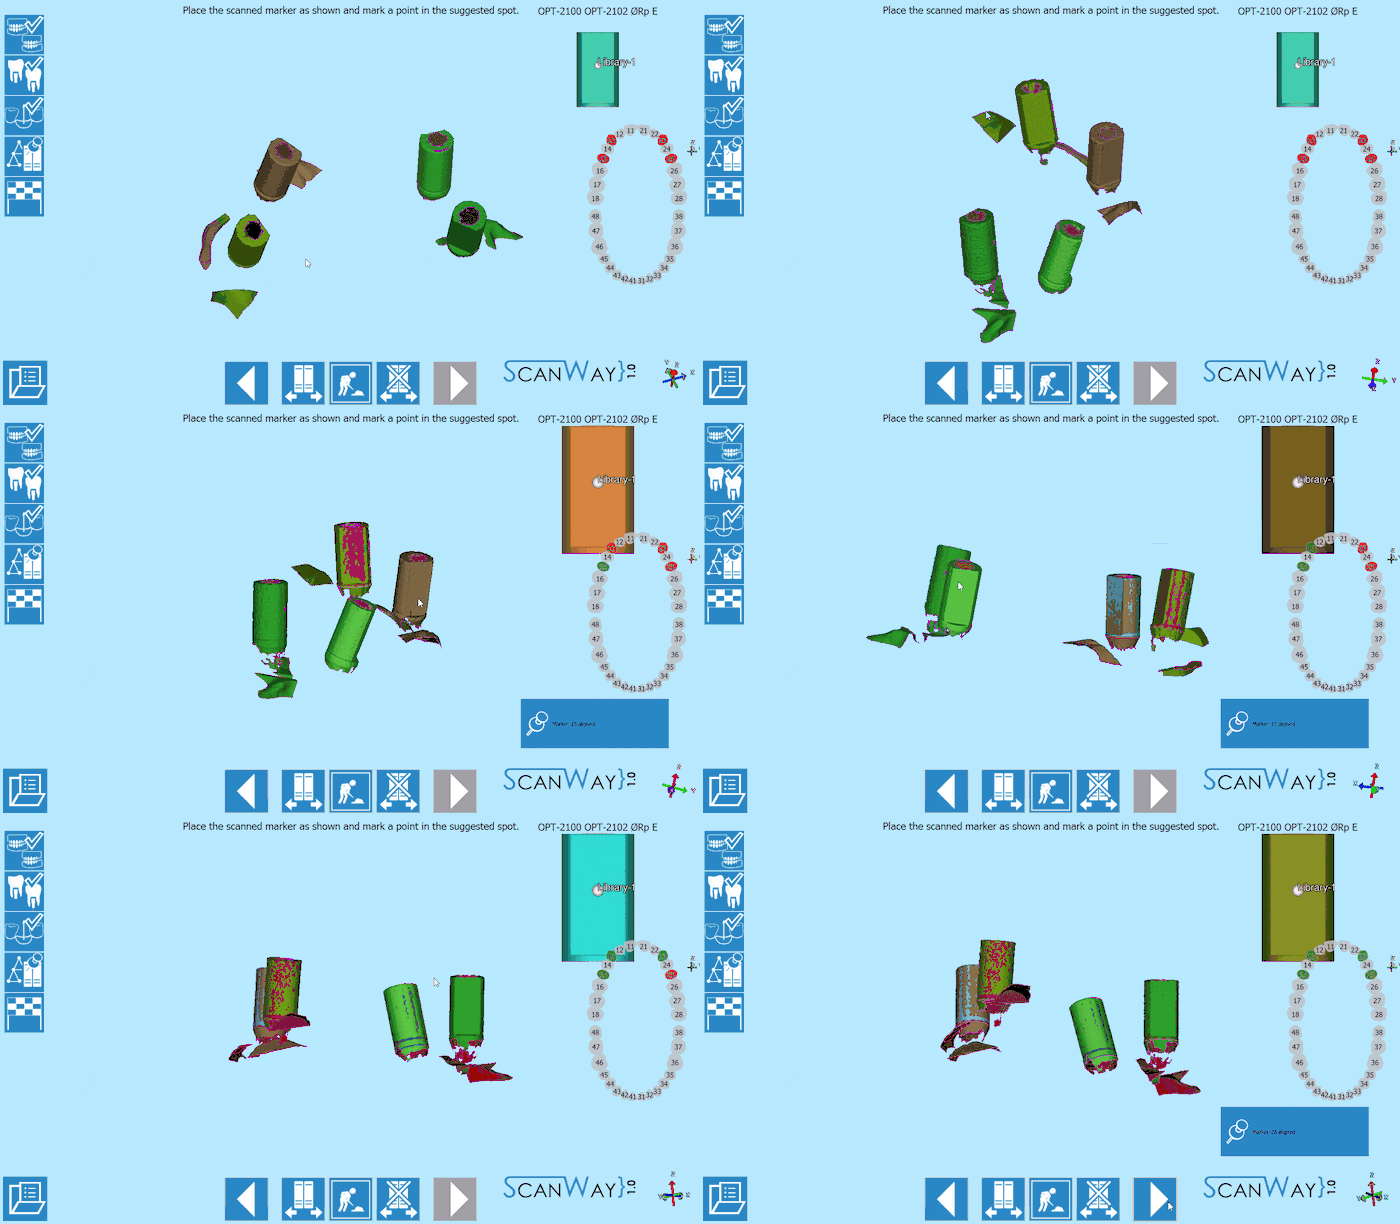
Para atender a sua finalidade, os marcadores precisam estar alinhados com uma "biblioteca de implantes": uma representação virtual, geométrica e precisa do scanbody que foi parafusada no analógico de gesso para marcar sua posição.
O alinhamento à biblioteca pode ser realizado tanto no software de escaneamento como no Exocad. Como o mercado de bibliotecas e scanbodies é tão diversificado, é possível que algumas bibliotecas não funcionem no nosso sistema.
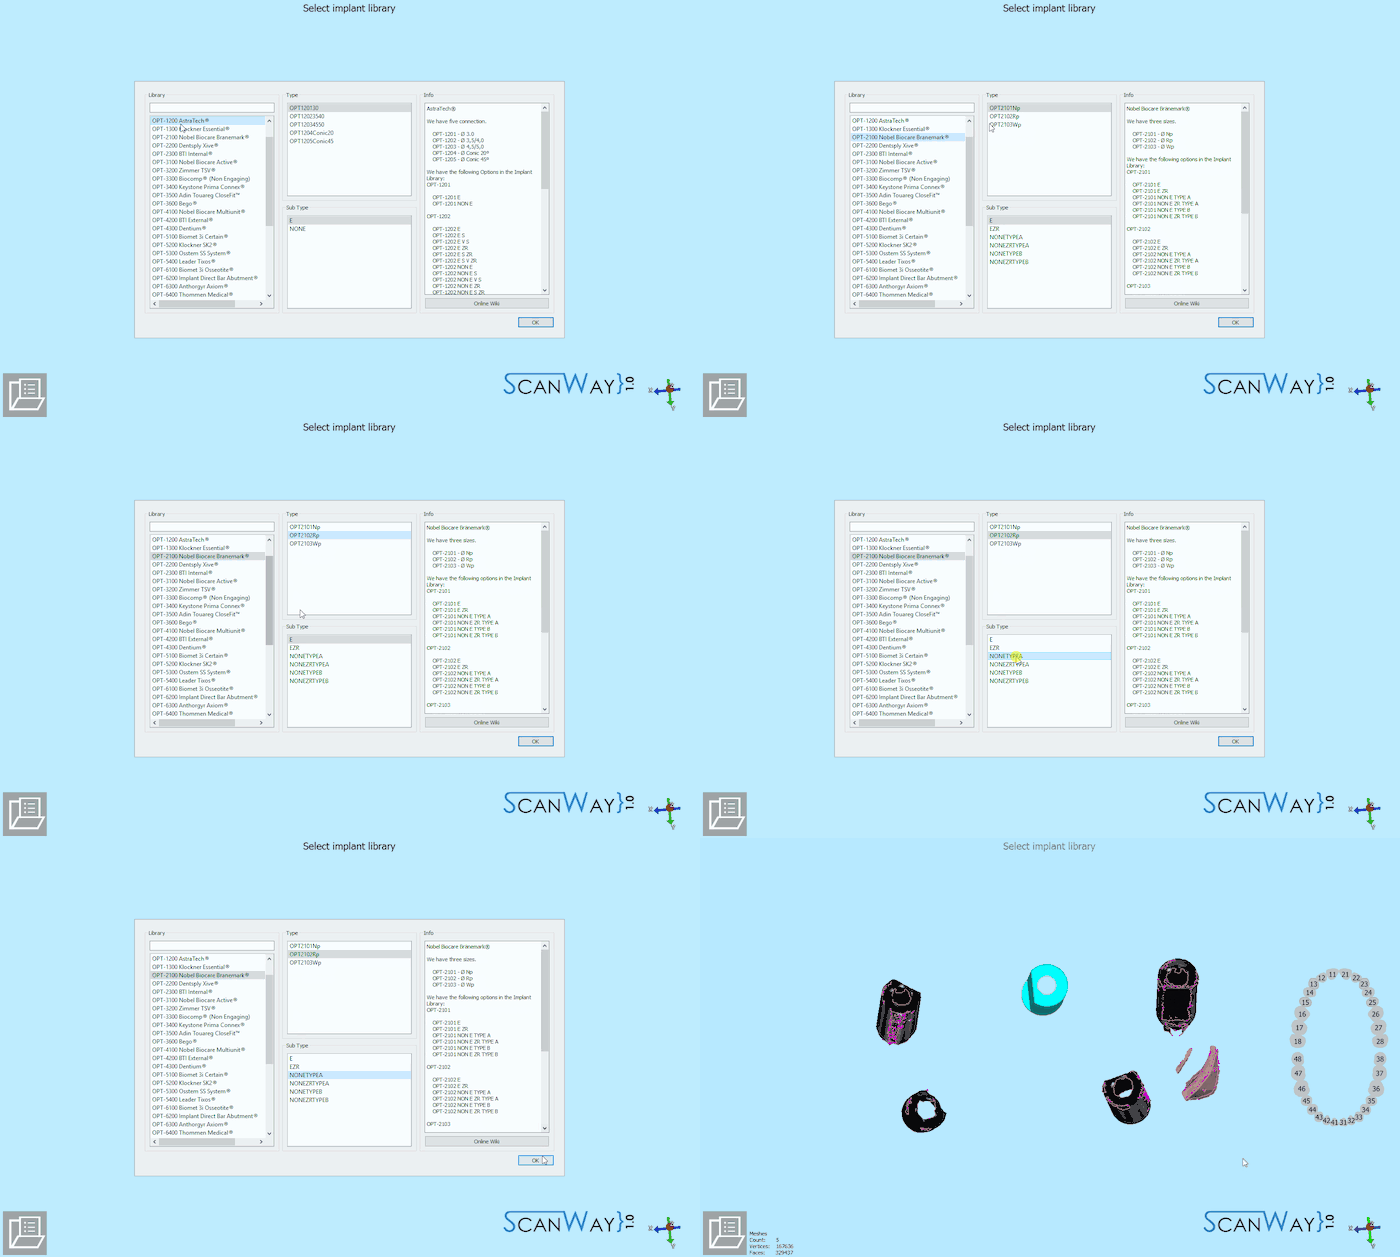
Aqui abaixo a seleção da biblioteca realizada para o nosso caso de demonstração:
Imediatamente após, o usuário será solicitado a alinhar o STL do marcador aos itens escaneados:
Para saber mais sobre como selecionar uma biblioteca e alinhar os scanbodies, visite a seção 'Alinhamento do marcador' da página Alignment Interface.
Etapa 6: Geração e Exportação de Mesh
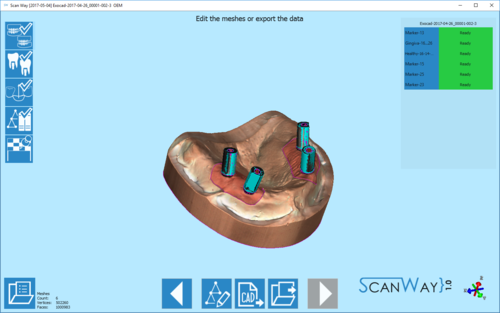
Neste ponto, o software inicia imediatamente a geração de mesh. As meshes podem ser editadas e exportadas individualmente ou como uma imagem única. Para saber mais sobre edição de mesh, visite nossa página Mesh Ferramentas.
Clique no Botão Exportar x25px para exportar para o CAD.
Se o projeto foi iniciado no Exocad, o CAD será aberto automaticamente e o projeto pode ser iniciado imediatamente. Caso contrário, o software irá perguntar ao usuário como exportar o arquivo
