Difference between revisions of "Mesh/ja"
(Created page with ";{{List button|prevAction.png}} 戻る: 前のステップに戻ります。このアイコンは、最初のスキャンステップでは無効になっています。 ;{{Li...") |
(Updating to match new version of source page) |
||
| (29 intermediate revisions by one other user not shown) | |||
| Line 11: | Line 11: | ||
ツールバーには以下のオプションがあります: | ツールバーには以下のオプションがあります: | ||
| − | ;{{List button|prevAction.png}} 戻る: | + | ;{{List button|prevAction.png}} 戻る: 前のステップに戻ります。最初のスキャンステップでは、アイコンが無効になります。 |
| − | ;{{List button|editSelectedAction.png}} メッシュ編集: | + | ;{{List button|editSelectedAction.png}} メッシュ編集: メッシュ編集ページを開きます。このページには、メッシュの品質を向上できるさまざまなツールがあります。これらのツールについては、後続のセクションで詳しく説明します。 |
;{{List button|exportToCadAction.png}} CADへエクスポート : 画像を選択したCADにエクスポートします。 | ;{{List button|exportToCadAction.png}} CADへエクスポート : 画像を選択したCADにエクスポートします。 | ||
;{{List button|exportVisibleAction.png}} エクスポート : 選択したフォルダにファイルをエクスポートします。 | ;{{List button|exportVisibleAction.png}} エクスポート : 選択したフォルダにファイルをエクスポートします。 | ||
;{{List button|nextAction.png}} 次へ: プロジェクト内の次のステップに進みます。ここはウィザードの最後のステップなので、このオプションは利用できません。 | ;{{List button|nextAction.png}} 次へ: プロジェクト内の次のステップに進みます。ここはウィザードの最後のステップなので、このオプションは利用できません。 | ||
| − | = | + | =メッシュツール= |
| − | + | {{Inline button|editSelectedAction.png}} をクリックすると、'''メッシュ編集'''ツールバーを利用できるようになります。メッシュツールはメッシュ生成中にある程度自動で適用されるので、ほとんどの場合でメッシュをさらに編集する必要はありません。 | |
{{Screenshot|meshtools.png}} | {{Screenshot|meshtools.png}} | ||
| − | ;{{List button|cancel.png}} | + | <div class="mw-translate-fuzzy"> |
| − | ;{{List button|rectSelTool.png}} | + | ;{{List button|cancel.png}} 終了 : オプションセクションを終了します。 |
| − | ;{{List button|selOpAction.png}} | + | ;{{List button|rectSelTool.png}} 選択ツール: 選択ツールパネルを開きます。このパネルでは、画像の一部分を選択する方法を選択できます。利用可能なツールについては、後続のセクションで説明します。 |
| − | ;{{List button|fillHolesAction.png}} | + | ;{{List button|selOpAction.png}} 選択アクション: アクションパネルを開きます。このパネルでは、画像で選択した部分でどのような操作を実行するか選択できます。利用可能なアクションについては、後続のセクションで説明します。 |
| − | ;{{List button|flipNormalsAction.png}} | + | ;{{List button|fillHolesAction.png}} 穴埋め: メッシュの穴を検出して埋めます。このオプションについては、後続のセクションで説明します。 |
| − | ;{{List button|fixProblemsAction.png}} | + | ;{{List button|flipNormalsAction.png}} 垂線の反転: メッシュの垂線をフリップして、上面と下面を反転させます。インプレッションおよびバイトのプロフィールでは、このツールは自動で実行されます。 |
| − | ;{{List button|smoothAction.png}} | + | ;{{List button|fixProblemsAction.png}} メッシュ修正: メッシュに構造上の問題がある場合、自動的に検出して修正します。 |
| − | ;{{List button|decimateAction.png}} | + | ;{{List button|smoothAction.png}} スムース: メッシュをなめらかにして、輪郭をくっきりさせるアドバンスツールです。このオプションについては、後続のセクションで説明します。 |
| − | ;{{List button|Ok.png}} | + | ;{{List button|decimateAction.png}} トライアングル削減: メッシュのトライアングル数を減らし、生成されるSTLファイルのサイズを削減します。このオプションについては、後続のセクションで説明します。 |
| + | ;{{List button|Ok.png}} 確定 : 変更内容を確定し、オプションセクションを閉じます。 | ||
| + | </div> | ||
| − | === | + | ===選択ツール=== |
[[File:selection-tools.gif]] | [[File:selection-tools.gif]] | ||
| − | + | 上の動画にあるように、これらのツールでは画像の一部を選択して、オブジェクトを編集できます。4つの選択ツールがあります。 | |
| − | ;{{List button|rectSelTool.png}} | + | ;{{List button|rectSelTool.png}} 矩形選択:クリックした点を始点とする矩形を描きます。マウスを動かしてから左マウスボタンを放すと、選択が決定されます。 |
| − | ;{{List button|elliSelTool.png}} | + | ;{{List button|elliSelTool.png}} 楕円形選択: クリックした点を中心点とする楕円形を描きます。マウスを動かしてから左マウスボタンを放すと、選択が決定されます。 |
| − | ;{{List button|lineSelTool.png}} | + | ;{{List button|lineSelTool.png}} フリークローズライン選択: 左マウスボタンをクリックしたまま線を描きます。左マウスボタンを放すと線がクローズされて、その中の領域がすべて選択されます。 |
| − | ;{{List button|polygonSelTool.png}} | + | ;{{List button|polygonSelTool.png}} 多角形選択: 2つの点をクリックすると線となり、3つ目以降の点をクリックすると多角形が作成されます。ダブルクリックすると多角形がクローズされ、その中の領域がすべて選択されます。 |
| − | === | + | ===アクション=== |
[[File:edit-actions.gif]] | [[File:edit-actions.gif]] | ||
| − | + | これらのアクションでは、選択された情報を編集できます。以下のアクションを利用できます: | |
| − | ;{{List button|cutSelAction.png}} | + | ;{{List button|cutSelAction.png}} 選択領域の削除 (DEL) : 現在選択されているデータを削除します。 |
| − | ;{{List button|cropSelAction.png}} | + | ;{{List button|cropSelAction.png}} 選択領域のトリミング ({{Inline button|Key_ctrl.png}} + K) : 選択されたデータのみを残し、残りのデータを削除します。 |
| − | ;{{List button|invertSelAction.png}} | + | ;{{List button|invertSelAction.png}} 選択領域の反転 ({{Inline button|Key_ctrl.png}} + I) : 選択されていないデータをすべて選択し、選択されているデータの選択を解除します。 |
| − | ;{{List button|clearSelAction.png}} | + | ;{{List button|clearSelAction.png}} 選択のクリア ({{Inline button|Key_ctrl.png}} + C) : すべてのデータの選択を解除します。 |
| − | === | + | ===すべての穴を埋める=== |
| − | + | インタラクティブなツールで、現在選択されているメッシュの穴を埋めることができます。 | |
[[File:fill-holes.gif]] | [[File:fill-holes.gif]] | ||
| − | + | ビデオにある通り、バーをドラッグして埋める必要のある穴のサイズを選択します。選択されると穴の輪郭が赤くなります。apply(適用)をクリックして確定し、選択した穴を埋めます。 | |
| − | === | + | ===スムージング=== |
| − | + | このツールは、メッシュの表面全体のスムージングを行い、不規則な部分があれば修正されます。 | |
{{Screenshot|smooth.png}} | {{Screenshot|smooth.png}} | ||
| − | + | このツールは2つのパラメーターを適用します。 | |
| − | ; | + | ;強度 |
| − | + | ツールがオブジェクト表面を変更させる強さ。値が高くなると、メッシュがよりなめらかになり、輪郭もさらにはっきりします。 | |
| − | ; | + | ;感度 |
| − | + | 「ディテール」(マージン、エッジ)として特定される表面部分の数。ディテール部分の輪郭ははっきりとなりますが、スムージングは行われません。 | |
| − | === | + | ===トライアングル削減=== |
| − | + | このツールはメッシュのトライアングルの数を減らします。スペースを節約しながらも、可能な限りのディテールを保持します。 | |
{{Screenshot|decimate.png}} | {{Screenshot|decimate.png}} | ||
| − | + | 保持するトライアングルの割合を入力することができます(例:50%と指定してメッシュサイズを半分にします)。 | |
| − | + | また、tolerance(許容値)を設定することもできます。許容値を有効にした場合、ソフトウェアは、この許容値パラメータを超えるメッシュを変更しようとした際に、削減処理を停止します。 | |
| − | + | ダイアログの下部には、トライアングル(または面)の初期数および削減後のトライアングル数が表示されます。 | |
| − | + | Apply(適用)をクリックして、結果を確認します。 | |
{{Navigation|[Align|Examples}} | {{Navigation|[Align|Examples}} | ||
Latest revision as of 13:26, 14 May 2018
構造
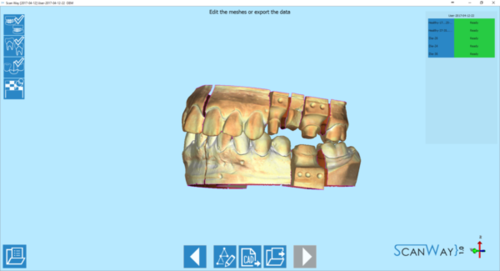
プロジェクトの最後のステップでは、生成されたメッシュが表示され、これを編集したりエクスポートしたりできます。
インターフェースに生成されたすべてのメッシュの画像が表示されます。右上には生成されたメッシュのリストがあり、ここで個々のファイルを選択して編集できます。ツールバーもあります。
ツールバーには以下のオプションがあります:
 戻る
戻る- 前のステップに戻ります。最初のスキャンステップでは、アイコンが無効になります。
 メッシュ編集
- メッシュ編集ページを開きます。このページには、メッシュの品質を向上できるさまざまなツールがあります。これらのツールについては、後続のセクションで詳しく説明します。
 CADへエクスポート
 - 画像を選択したCADにエクスポートします。
 エクスポート
 - 選択したフォルダにファイルをエクスポートします。
 次へ
次へ- プロジェクト内の次のステップに進みます。ここはウィザードの最後のステップなので、このオプションは利用できません。
メッシュツール
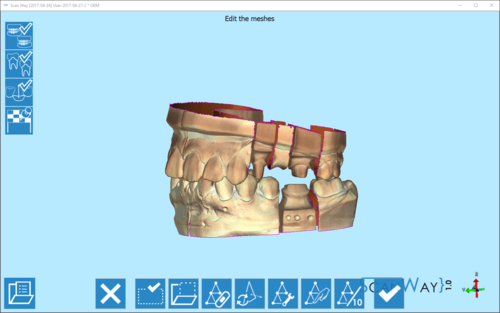
![]() をクリックすると、メッシュ編集ツールバーを利用できるようになります。メッシュツールはメッシュ生成中にある程度自動で適用されるので、ほとんどの場合でメッシュをさらに編集する必要はありません。
をクリックすると、メッシュ編集ツールバーを利用できるようになります。メッシュツールはメッシュ生成中にある程度自動で適用されるので、ほとんどの場合でメッシュをさらに編集する必要はありません。
 終了
終了- オプションセクションを終了します。
 選択ツール
選択ツール- 選択ツールパネルを開きます。このパネルでは、画像の一部分を選択する方法を選択できます。利用可能なツールについては、後続のセクションで説明します。
 選択アクション
- アクションパネルを開きます。このパネルでは、画像で選択した部分でどのような操作を実行するか選択できます。利用可能なアクションについては、後続のセクションで説明します。
 穴埋め
穴埋め- メッシュの穴を検出して埋めます。このオプションについては、後続のセクションで説明します。
 垂線の反転
垂線の反転- メッシュの垂線をフリップして、上面と下面を反転させます。インプレッションおよびバイトのプロフィールでは、このツールは自動で実行されます。
 メッシュ修正
- メッシュに構造上の問題がある場合、自動的に検出して修正します。
 スムース
スムース- メッシュをなめらかにして、輪郭をくっきりさせるアドバンスツールです。このオプションについては、後続のセクションで説明します。
 トライアングル削減
- メッシュのトライアングル数を減らし、生成されるSTLファイルのサイズを削減します。このオプションについては、後続のセクションで説明します。
 確定
確定- 変更内容を確定し、オプションセクションを閉じます。
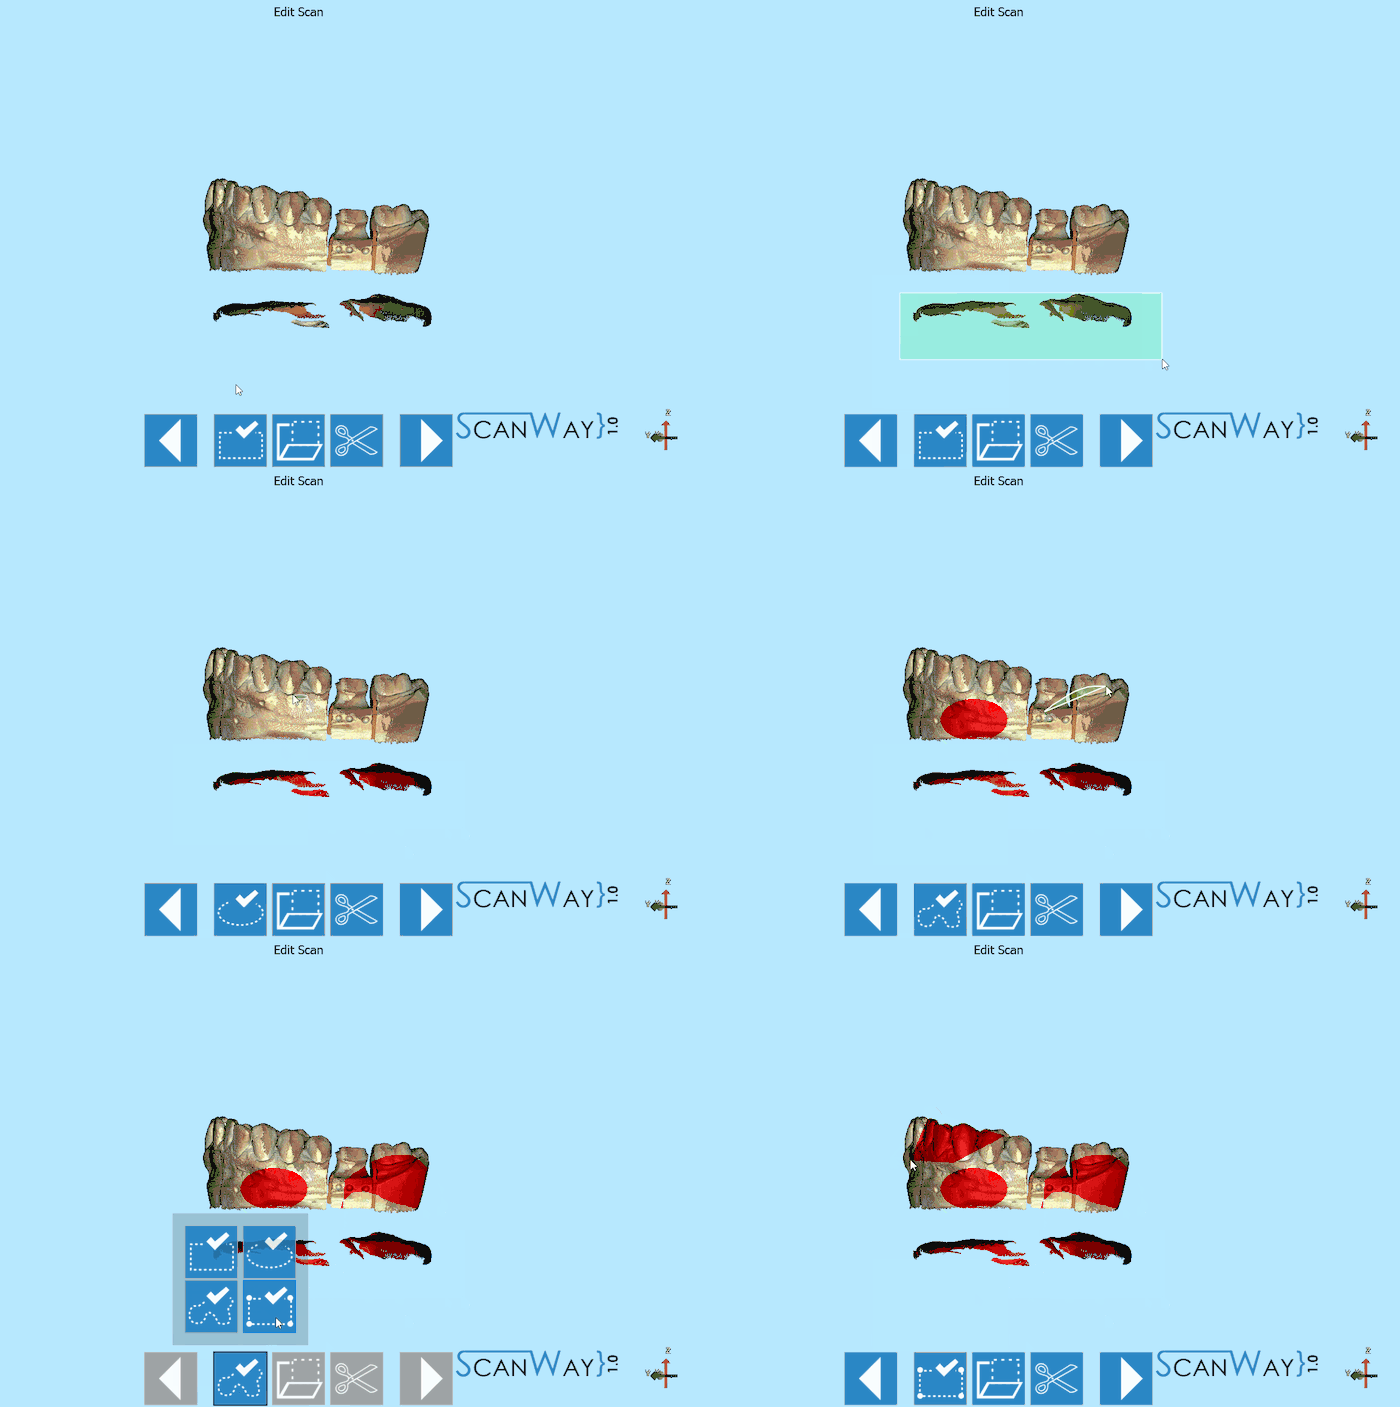
選択ツール
上の動画にあるように、これらのツールでは画像の一部を選択して、オブジェクトを編集できます。4つの選択ツールがあります。
 矩形選択
矩形選択- クリックした点を始点とする矩形を描きます。マウスを動かしてから左マウスボタンを放すと、選択が決定されます。
 楕円形選択
楕円形選択- クリックした点を中心点とする楕円形を描きます。マウスを動かしてから左マウスボタンを放すと、選択が決定されます。
 フリークローズライン選択
- 左マウスボタンをクリックしたまま線を描きます。左マウスボタンを放すと線がクローズされて、その中の領域がすべて選択されます。
 多角形選択
多角形選択- 2つの点をクリックすると線となり、3つ目以降の点をクリックすると多角形が作成されます。ダブルクリックすると多角形がクローズされ、その中の領域がすべて選択されます。
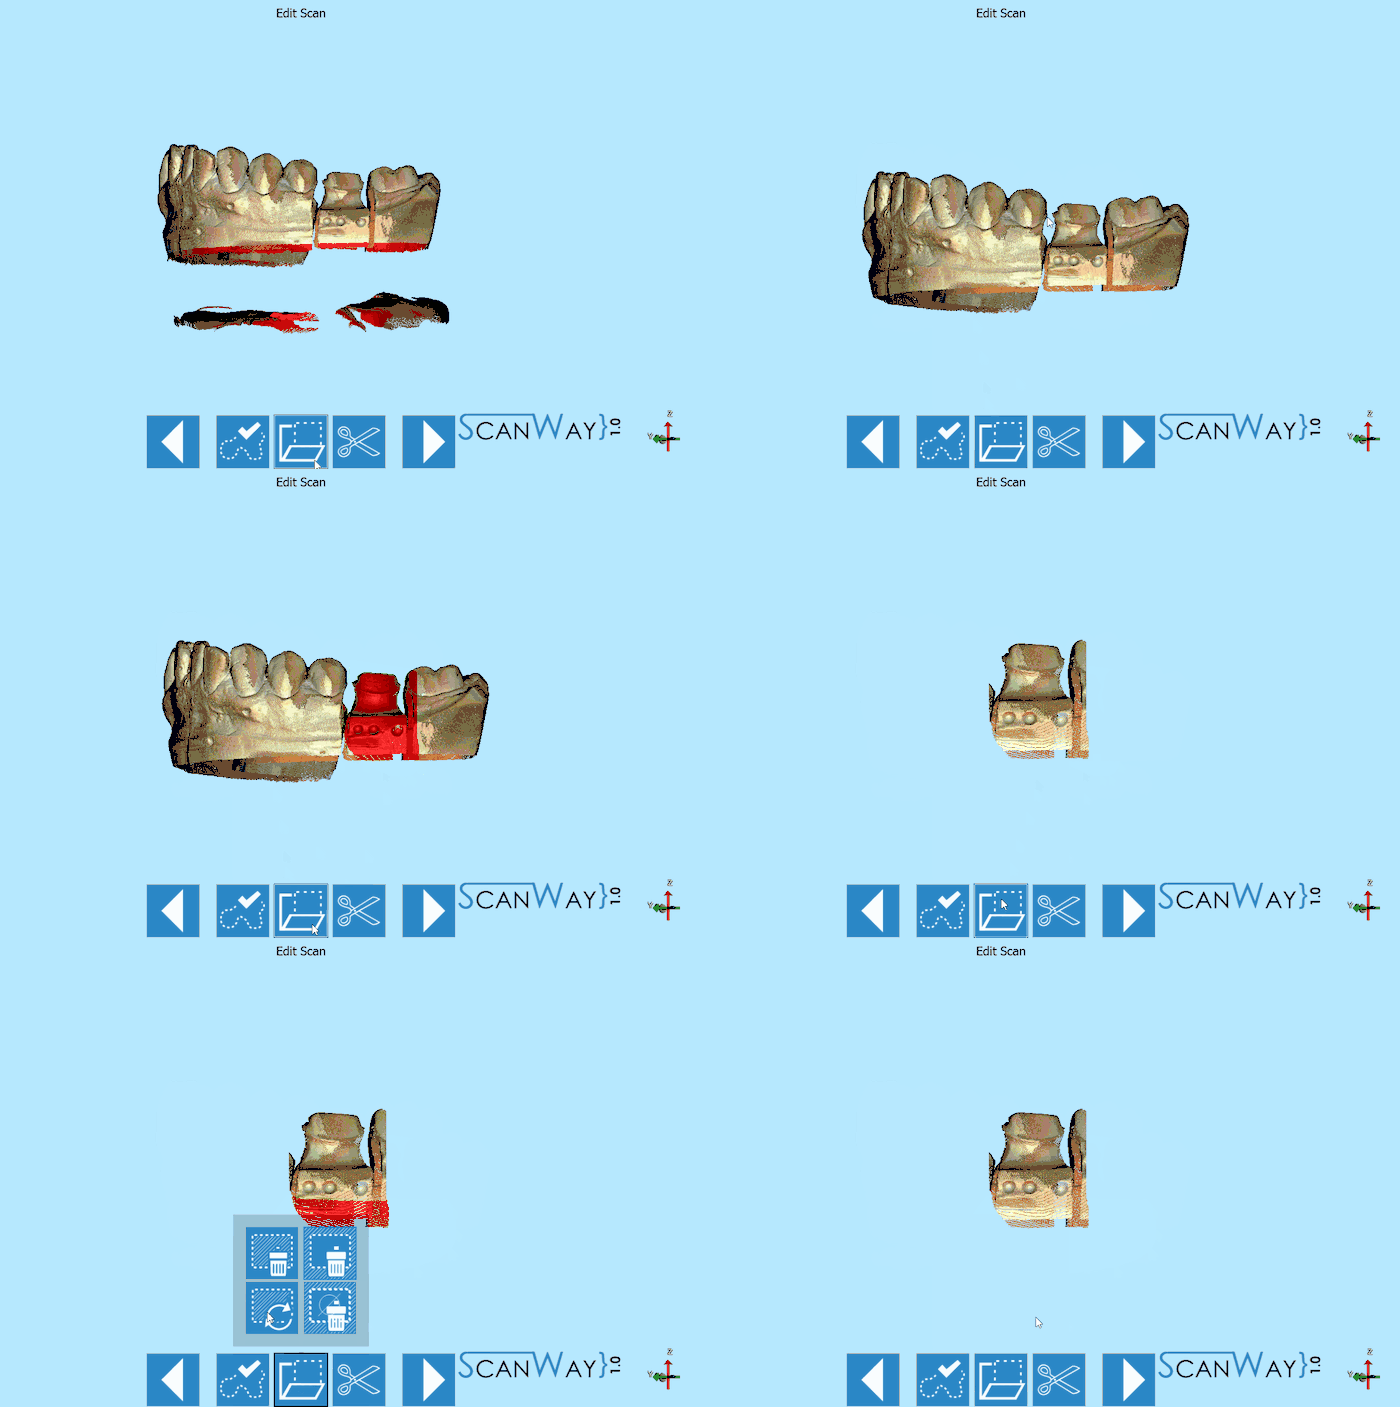
アクション
これらのアクションでは、選択された情報を編集できます。以下のアクションを利用できます:
 選択領域の削除 (DEL)
 - 現在選択されているデータを削除します。
 選択領域のトリミング (
 + K)
+ K) - 選択されたデータのみを残し、残りのデータを削除します。
 選択領域の反転 (
 + I)
+ I) - 選択されていないデータをすべて選択し、選択されているデータの選択を解除します。
 選択のクリア (
 + C)
+ C) - すべてのデータの選択を解除します。
すべての穴を埋める
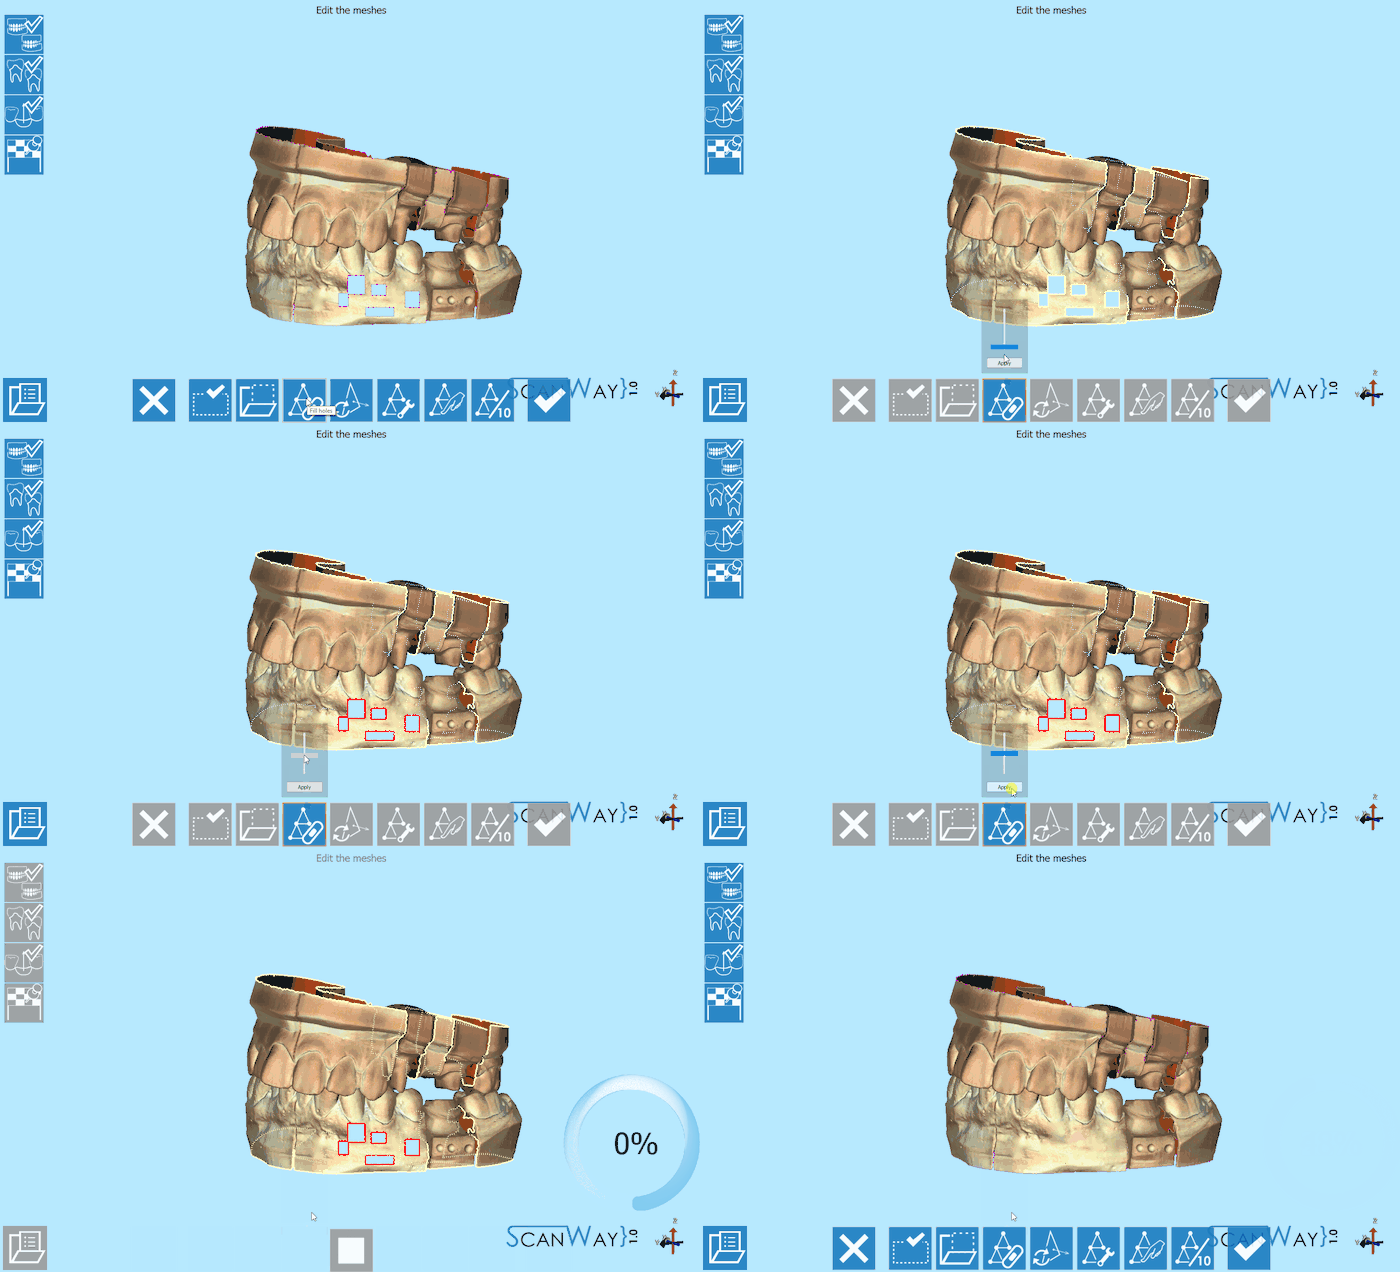
インタラクティブなツールで、現在選択されているメッシュの穴を埋めることができます。
ビデオにある通り、バーをドラッグして埋める必要のある穴のサイズを選択します。選択されると穴の輪郭が赤くなります。apply(適用)をクリックして確定し、選択した穴を埋めます。
スムージング
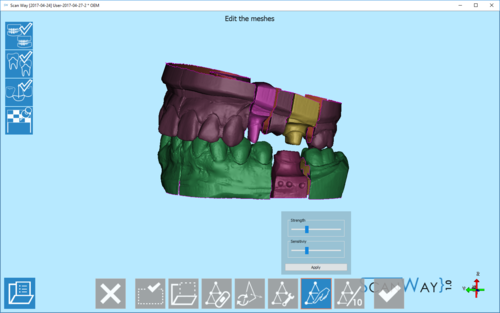
このツールは、メッシュの表面全体のスムージングを行い、不規則な部分があれば修正されます。
このツールは2つのパラメーターを適用します。
- 強度
ツールがオブジェクト表面を変更させる強さ。値が高くなると、メッシュがよりなめらかになり、輪郭もさらにはっきりします。
- 感度
「ディテール」(マージン、エッジ)として特定される表面部分の数。ディテール部分の輪郭ははっきりとなりますが、スムージングは行われません。
トライアングル削減
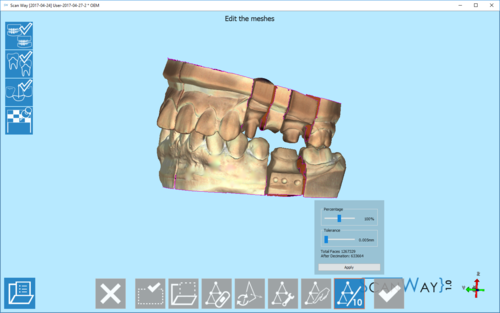
このツールはメッシュのトライアングルの数を減らします。スペースを節約しながらも、可能な限りのディテールを保持します。
保持するトライアングルの割合を入力することができます(例:50%と指定してメッシュサイズを半分にします)。
また、tolerance(許容値)を設定することもできます。許容値を有効にした場合、ソフトウェアは、この許容値パラメータを超えるメッシュを変更しようとした際に、削減処理を停止します。
ダイアログの下部には、トライアングル(または面)の初期数および削減後のトライアングル数が表示されます。
Apply(適用)をクリックして、結果を確認します。
