Full Jaw Project
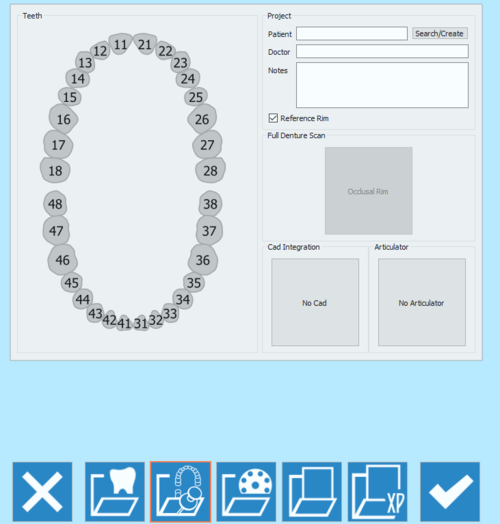
La seconda icona della pagina di definizione del progetto apre la pagina Progetto per Arcata Completa.
Questa pagina permette di creare progetti per la scansione di arcate complete, da utilizzare in casi di ortodonzia o di scheletrati o in qualsiasi altro caso in cui è necessario acquisire l'arcata completa con o senza l'arcata antagonista.
La finestra per la definizione del progetto si divide in 5 sezioni
Contents
Definizione dei Denti
Nella prima sezione Denti fare click su di un dente per selezionare o deselezionare l'intera arcata.
Progetto
La sezione Progetto permette all'utente di specificare alcune Informazioni Generali:
- Nome del Paziente
- Nome del Dottore (Opzionale)
- Note (Opzionale)
- Una casella di spunta per decidere se usare o meno l'Anello di Riferimento.
È possibile scrivere liberamente nei campi Dottore e Note. In quello Paziente, è possibile:
- scrivere liberamente nel campo
- creare un nuovo profilo cliccando sul bottone Cerca/Crea
- cercare nel database per un profilo già esistente cliccando sul bottone Cerca/Crea
Il Bottone Cerca/Crea apre la seguente finestra:
This window allows to search the project database for already existing patients. A filter can be applied and, for those who use VDDS protocols, the research can be restricted to that specific database.
By clicking on the Create button, the following window opens:
The patient creation panel allows to input general information rrgarding the patient and the treatment, such as:
- The patient's name
- The patient's birth date
- The patient's Sex
- The doctor's name
- The patient's insurance ID, where applies
- Some notes
Once all the information has been filled in, select Ok to accept the data or Cancel to discard the changes and go back to the project definition page.
Full Denture Scan
In this section it is possible to signal the software that the occlusal rim needs to be scanned for a full denture project.
Just click on the With Occlusal Rim box to activate this option.
Cad Integration
When the project is started directly from Exocad, the STL files produced in the scanning process will be transmitted to Exocad in just one click. On the other end, if the project gets created in the scanning software, the automatic export to CAD will not be configured, unless it is selected in this section.
By by clicking on the No Cad box the CAD selection window opens.
and it allows to choose one of the software integrated with our scanning system for automatic trasmission of the STL information.
- Exocad
- VDDS protocol (for orthodontics)
- Onyx Ceph (for orthodontics)
If No Cad is selected, the software will then ask the user to define an export path for the STL files.
Articulators
The last section allows to select an articolator to use the Dynamic Articulation Module.
If the Dynamic Articulation module is not active on the license this section will not be available
Remember that it is always possible to scan any kind of articulator, this section is only to be used if you want to scan with the dynamic articulation module and pass the occlusion position in the Virtual Articulator of Exocad.
The Articulators available in Exocad and therefore in our software are:
- Artex
- to scan the Artex Articulator and to use the same in Exocad's Virtual Articulator
- Sam/ Adesso
- to scan the Sam Articulator or the Adesso splitcast and to use the same in Exocad's Virtual Articulator
- Protar- Kavo
- to scan the Kavo Articulator and to use the same in Exocad's Virtual Articulator
- A7 - Bioart
- to scan the Bioart Articulator and to use the same in Exocad's Virtual Articulator
- Denar by Whipmix
- to scan the Denar Articulator and to use the same in Exocad's Virtual Articulator
To start the project accept the definition with the button.
To find specific information on how to scan in Free / Expert mode, go to the Full Jaw Project example page.
