Mesh Tools
Contents
Estrutura
Na última etapa de qualquer projeto, as meshes geradas são mostradas e podem ser editadas ou exportadas
A interface mostra a imagem de todas as meshes geradas; a lista das meshes geradas, no canto superior direito da interface, a partir da qual podem ser selecionados arquivos individuais para editar; uma barra de ferramentas específica.
A barra de ferramentas oferece essas opções:
- 40px Anterior
- volta para a etapa anterior. Ícone não ativo durante a primeira etapa do escaneamento.
- 40px Editar Meshes
- Abre a página de edição de mesh que fornece várias ferramentas para melhorar a qualidade da mesh. Todas essas ferramentas serão explicadas em detalhes mais adiante nesta página.
- 40px Exportar para CAD
- Exporta as imagens para o CAD selecionado.
- 40px Exportar Visível
- Exporta os arquivos para uma pasta selecionada.
- 40px Avançar
- Avança uma etapa para frente no projeto. Esta opção não está disponível, sendo este o último passo do assistente.
Ferramentas de Mesh
Ao clicar no botão x25px, a barra de ferramentas 'editar mesh' fica disponível. As ferramentas de mesh são aplicadas automaticamente em alguma medida durante a geração de mesh, é raramente necessário re-editar a mesh.
 Sair
Sair- sai da seção Opção.
 Ferramentas de seleção
- Abre o painel da ferramenta de seleção no qual é possível escolher como selecionar parte da imagem. As ferramentas disponíveis serão descritas posteriormente nesta página.
- 40px Selecionar Ação
- Abre o painel de ações no qual é possível escolher o que fazer com a parte selecionada da imagem. As ações disponíveis serão descritas mais adiante nesta página.
- 40px Preencher furos
- detecta e preenche um ou mais furos em uma mesh. Esta opção será explicada em detalhes mais adiante nesta página.
- 40px Gira Normais
- gira a mesh normal que inverte a superfície superior com a parte inferior. Esta ferramenta é executada automaticamente na impressão e nos perfis de mordida.
- 40px Corrige Mesh
- detecta e corrige automaticamente os problemas estruturais de uma mesh, se houver.
- 40px Liso
- ferramenta avançada para aprimorar e definir uma mesh. Esta opção será explicada em detalhes mais adiante nesta página.
- 40px Dizimar
- Reduz o número de triângulos de uma mesh e, casualmente, o peso do arquivo STL gerado. Esta opção será explicada em detalhes mais adiante nesta página.
 Aceitar
- Aceita as alterações e fecha a seção de opção.
Ferramentas de Seleção
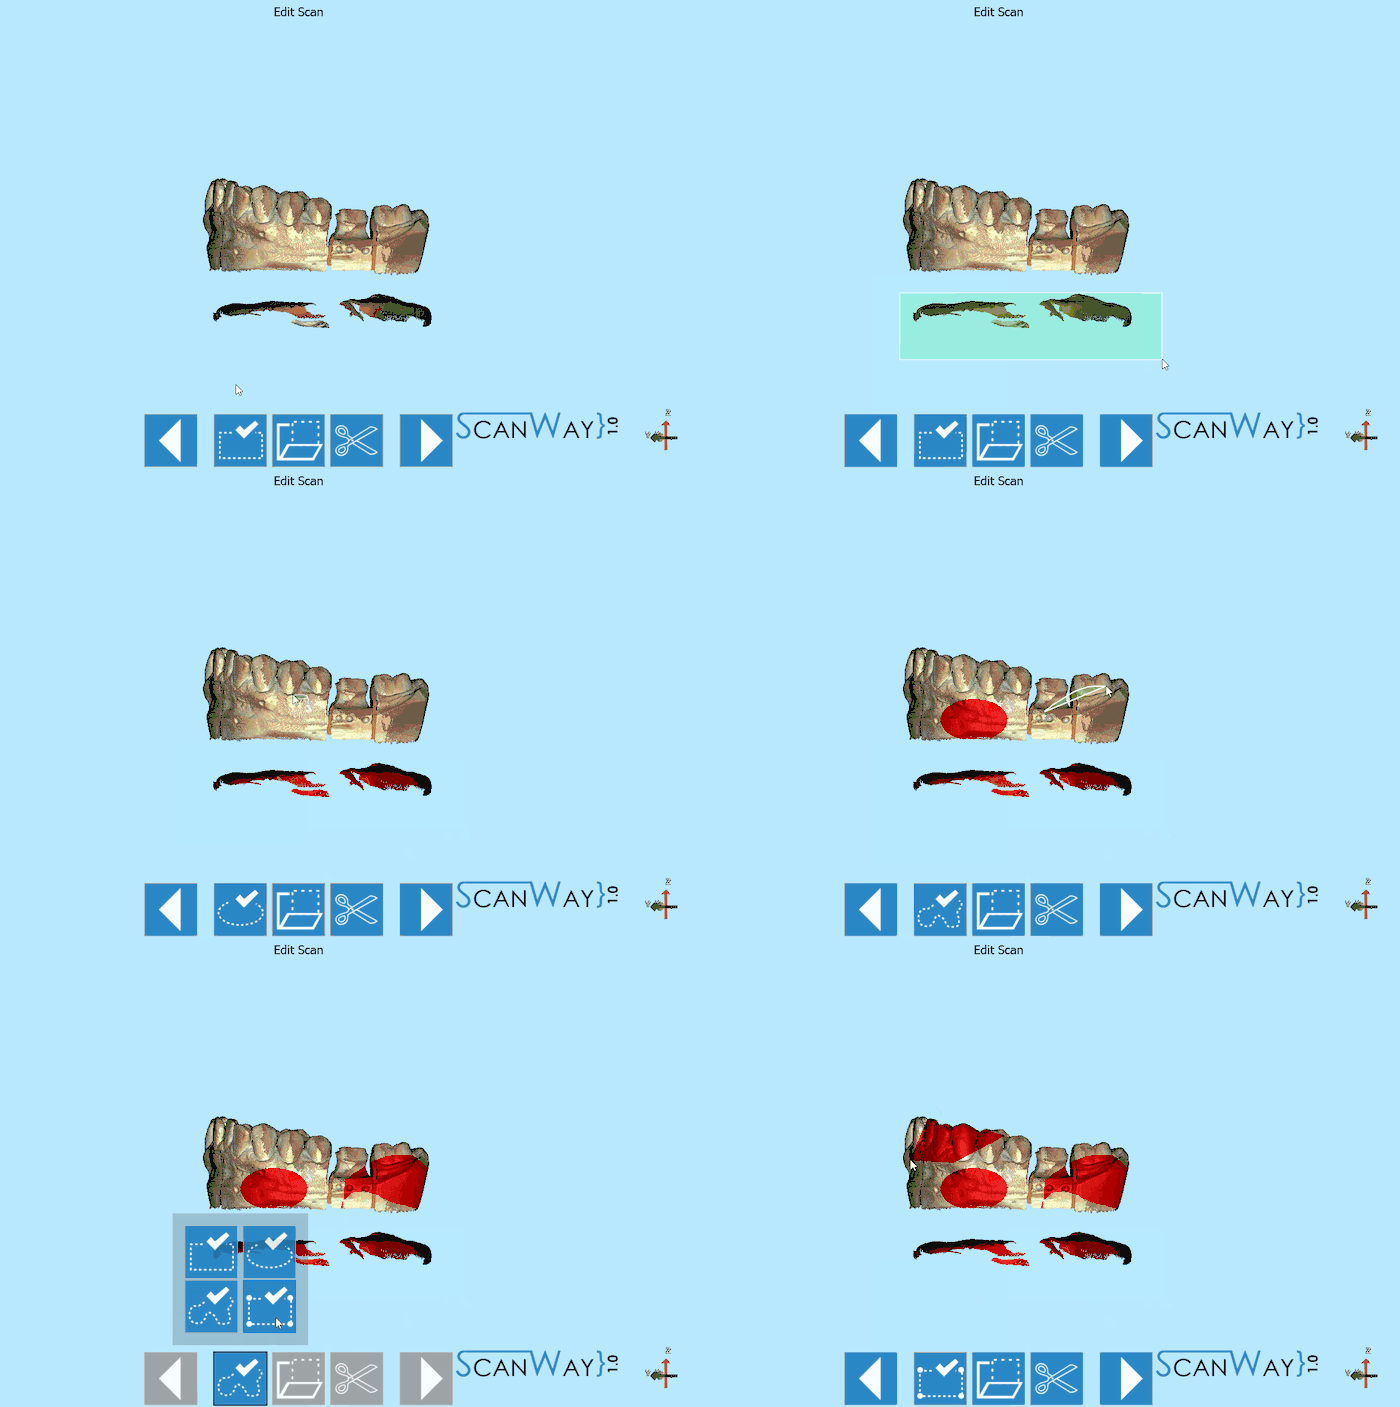
Conforme mostrado no GIF, essas ferramentas permitem selecionar parte da imagem para editar o objeto. Quatro ferramentas de seleção estão disponíveis:
 Rectangular Selection
- Draws a rectangle that starts from the click point and grows following the mouse; to select, release the left mouse button.
 Elliptical Selection
- Draws an ellipse centered in the click point that grows following the mouse; to select, release the left mouse button.
 Free Closed Line Selection
- Click and hold the left mouse button to start drawing a line that follows the mouse. Release the left mouse button to close the line and select all the area inside its borders.
 Polygonal Selection
- Click in two different points to draw a line and a third point to create a polygon. Double click to close the polygon and select all the area inside its borders
Actions
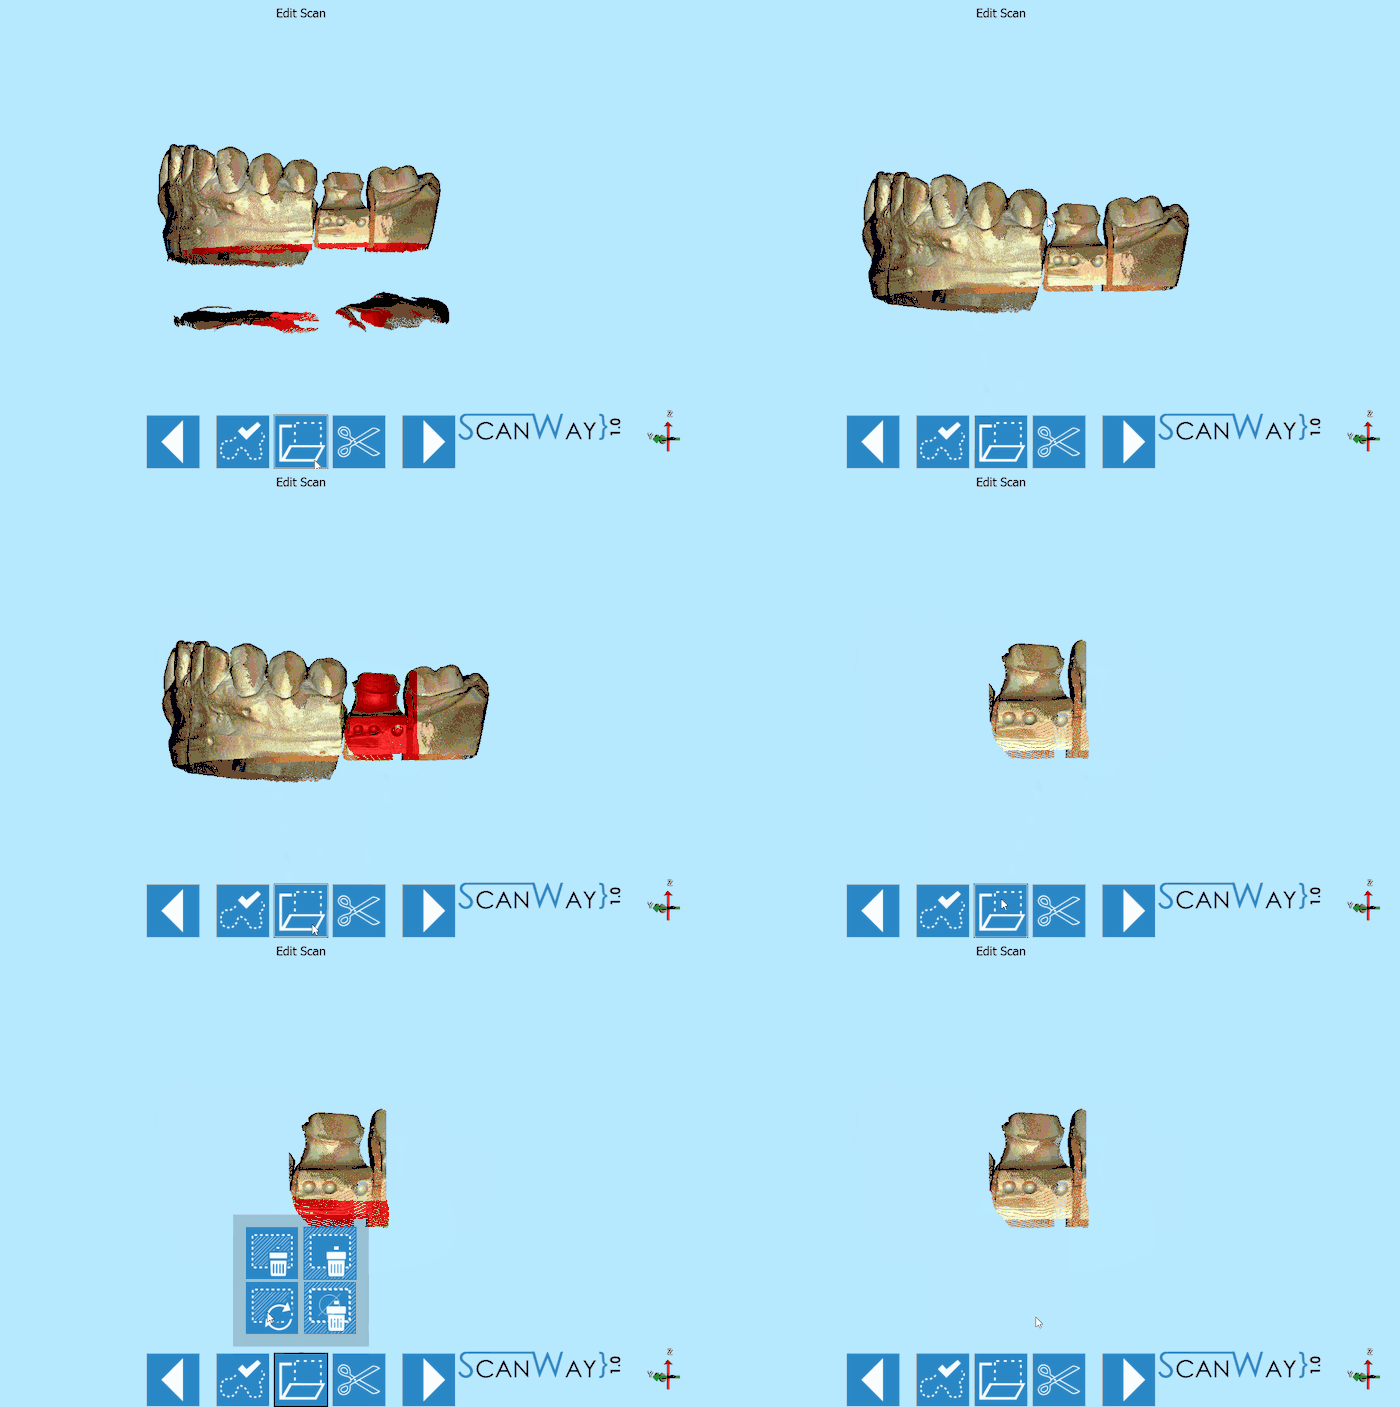
These actions allow to modify the selected information. The following actions are available:
 Delete Selection (DEL)
 - Deletes the currently selected data.
 Crop Selection (
 + K)
+ K) - Keeps only the selected data and removes all the rest.
 Invert Selection (
 + I)
+ I) - Selects all the data that is not selected and deselects the selected data.
 Clear Selection (
 + C)
+ C) - Deselects all the data.
Fill All Holes
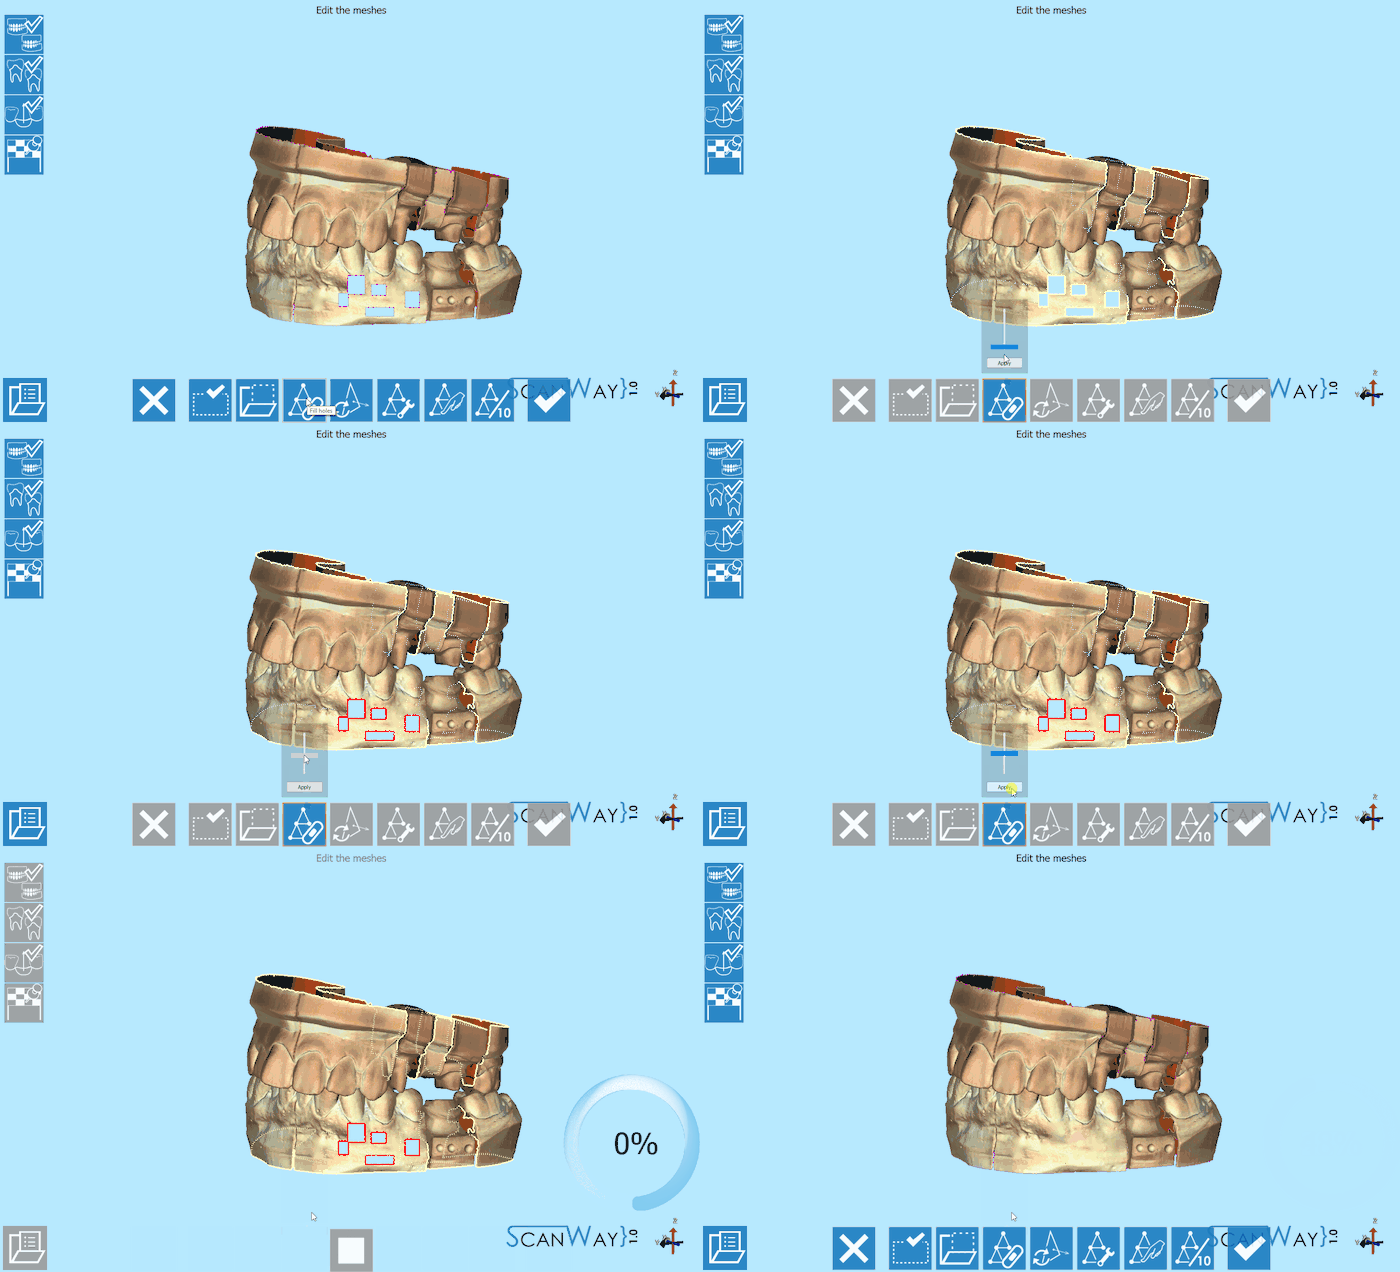
This is an interactive tool that allows to fill the holes in the currently selected mesh.
As shown in the video, drag the bar to choose the size of the holes that need to be filled. The holes contour will turn red when they are selected. Click apply to accept and fill the selected holes.
Smooth
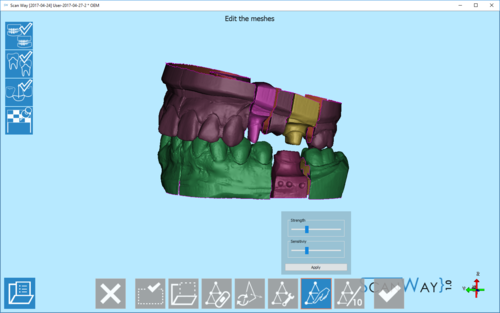
This tool smooths the whole surface of the mesh, compensating its irregularities, if there are any.
This tool applies two parameters:
- Strength
How much the tool can change the object surface. The higher the value the more the mesh is smoothed and sharpened.
- Sensitivity
How many parts of the surface will be identified as 'Details' (margins, edges). The detail parts will be sharpened, but not smoothed.
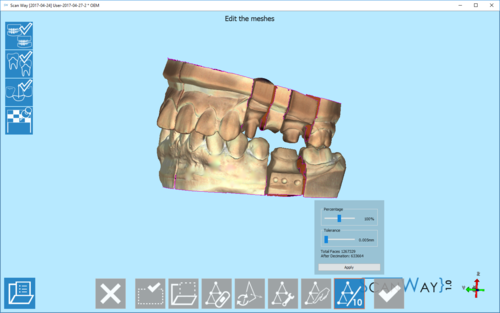
Decimate
This tool reduces the number of triangles in a mesh, to save more space, trying to preserve as much detail as possible.
It is possible to insert a percentage of triangles to be kept (For example 50% to halve the mesh size).
It is also possible to establish a tolerance value. If the tolerance is enabled, the software will stop the decimation when this would modify the mesh more than the tolerance parameter.
On the bottom of the dialog appears the initial number of triangles (or Faces) and the number of triangles after decimation.
Just click on Apply to see the result.
