Difference between revisions of "Service"
| (One intermediate revision by one other user not shown) | |||
| Line 12: | Line 12: | ||
<!--T:4--> | <!--T:4--> | ||
| − | The bar on the left of the live window allows to lower or increase the light intensity; if the object is very bright, the light saturation will be shown in red and the light | + | The bar on the left of the live window allows to lower or increase the light intensity; if the object is very bright, the light saturation will be shown in red and the light intensity can be lowered to reach the best light configuration for any object. |
<!--T:5--> | <!--T:5--> | ||
| Line 21: | Line 21: | ||
<!--T:7--> | <!--T:7--> | ||
| − | ;{{List button|cancel.png}} Exit : Exits the | + | ;{{List button|cancel.png}} Exit : Exits the Options section. |
;{{List button|testScannerAction.png}} Test Scanner Connection : This action checks if the scanner is correctly connected. If not, it shows the relevant error message. | ;{{List button|testScannerAction.png}} Test Scanner Connection : This action checks if the scanner is correctly connected. If not, it shows the relevant error message. | ||
| − | ;{{List button|headCalibAction.png}} Optical Head Calibration : This action starts the calibration procedure of the optical components of the scanner. For | + | ;{{List button|headCalibAction.png}} Optical Head Calibration : This action starts the calibration procedure of the optical components of the scanner. For further information visit the page [[Calibrations|Calibrate your scanner]]. |
| − | ;{{List button|axisCalibAction.png}} Axis Calibration : This action starts the calibration procedure of the movement system of the scanner. For | + | ;{{List button|axisCalibAction.png}} Axis Calibration : This action starts the calibration procedure of the movement system of the scanner. For further information visit the page [[Calibrations|Calibrate your scanner]]. |
| − | ;{{List button|colorCalibAction.png}} Color Calibration : This action starts the calibration procedure of the color recognition of the scanner. For | + | ;{{List button|colorCalibAction.png}} Color Calibration : This action starts the calibration procedure of the color recognition of the scanner. For further information visit the page [[Calibrations|Calibrate your scanner]]. |
| − | ;{{List button|Ok.png}} Accept : Accepts the changes and closes the | + | ;{{List button|Ok.png}} Accept : Accepts the changes and closes the options section. |
</translate> | </translate> | ||
{{Navigation|Options|NewPrj}} | {{Navigation|Options|NewPrj}} | ||
Latest revision as of 11:48, 11 January 2018
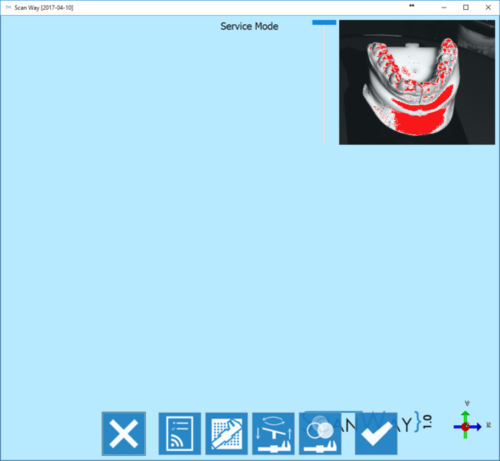
The Service mode allows to check the scanner's operativity and to calibrate. Scanner Calibration will be explained in a specific page.
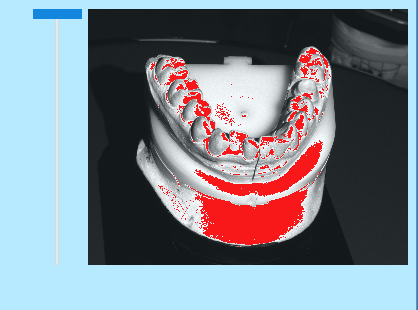
In Service mode the live view of the cameras is always on (top-right corner), to allow a better handling of the service operations.
The bar on the left of the live window allows to lower or increase the light intensity; if the object is very bright, the light saturation will be shown in red and the light intensity can be lowered to reach the best light configuration for any object.
All the service operations can be accessed using the lower toolbar.
 Exit
Exit- Exits the Options section.
 Test Scanner Connection
- This action checks if the scanner is correctly connected. If not, it shows the relevant error message.
 Optical Head Calibration
- This action starts the calibration procedure of the optical components of the scanner. For further information visit the page Calibrate your scanner.
 Axis Calibration
- This action starts the calibration procedure of the movement system of the scanner. For further information visit the page Calibrate your scanner.
 Color Calibration
- This action starts the calibration procedure of the color recognition of the scanner. For further information visit the page Calibrate your scanner.
 Accept
- Accepts the changes and closes the options section.


