Difference between revisions of "Service/ja"
(Created page with "サービスモードでは、操作を行いやすくなるよう、カメラのライブビューが常にオンになります(右上)。") |
(Updating to match new version of source page) |
||
| (6 intermediate revisions by one other user not shown) | |||
| Line 5: | Line 5: | ||
{{Screenshot|Service mode.png}} | {{Screenshot|Service mode.png}} | ||
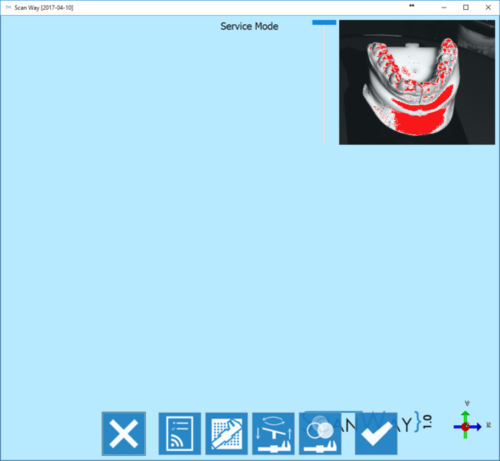
| − | + | サービスモードでは、操作を実行しやすくするため、カメラのライブビューが常にオンになります(右上)。 | |
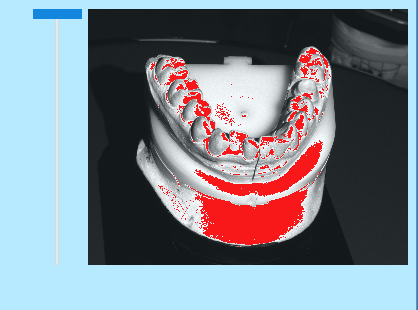
| − | + | ライブウインドウの左側にあるバーで光の輝度を調整できます。オブジェクトが明るすぎる場合は光の彩度が赤く表示されるので、輝度を下げ、オブジェクトの明るさを適度に調整して下さい。 | |
[[File:detail_live.png]] | [[File:detail_live.png]] | ||
| − | + | 下部のツールバーから、サービスに関するすべての操作にアクセスできます。 | |
| − | ;{{List button|cancel.png}} | + | <div class="mw-translate-fuzzy"> |
| − | ;{{List button|testScannerAction.png}} | + | ;{{List button|cancel.png}} 終了 : オプションセクションを終了します。 |
| − | ;{{List button|headCalibAction.png}} | + | ;{{List button|testScannerAction.png}} スキャナー接続のテスト : スキャナーが正しく接続されていることを確認します。正しく接続されていない場合はエラーメッセージが表示されます。 |
| − | ;{{List button|axisCalibAction.png}} | + | ;{{List button|headCalibAction.png}} 光学ヘッドのキャリブレーション : スキャナーの光学コンポーネントのキャリブレーションを開始します。詳しくは、[[Calibrations|スキャナーのキャリブレーション]]のページを参照して下さい。 |
| − | ;{{List button|colorCalibAction.png}} | + | ;{{List button|axisCalibAction.png}} 軸のキャリブレーション : スキャナーの駆動システムのキャリブレーションを開始します。詳しくは、[[Calibrations|スキャナーのキャリブレーション]]のページを参照して下さい。 |
| − | ;{{List button|Ok.png}} | + | ;{{List button|colorCalibAction.png}} 色のキャリブレーション : スキャナーの色認識のキャリブレーションを開始します。詳しくは、[[Calibrations|スキャナーのキャリブレーション]]のページを参照して下さい。 |
| + | ;{{List button|Ok.png}} 確定 : 変更内容を確定し、オプションセクションを終了します。 | ||
| + | </div> | ||
{{Navigation|Options|NewPrj}} | {{Navigation|Options|NewPrj}} | ||
Latest revision as of 13:46, 2 May 2018
サービスモードでは、スキャナーの動作状況の確認およびキャリブレーションを行えます。スキャナーのキャリブレーションについては、キャリブレーションに関するページを参照して下さい。
サービスモードでは、操作を実行しやすくするため、カメラのライブビューが常にオンになります(右上)。
ライブウインドウの左側にあるバーで光の輝度を調整できます。オブジェクトが明るすぎる場合は光の彩度が赤く表示されるので、輝度を下げ、オブジェクトの明るさを適度に調整して下さい。
下部のツールバーから、サービスに関するすべての操作にアクセスできます。
 終了
終了- オプションセクションを終了します。
 スキャナー接続のテスト
- スキャナーが正しく接続されていることを確認します。正しく接続されていない場合はエラーメッセージが表示されます。
 光学ヘッドのキャリブレーション
- スキャナーの光学コンポーネントのキャリブレーションを開始します。詳しくは、スキャナーのキャリブレーションのページを参照して下さい。
 軸のキャリブレーション
- スキャナーの駆動システムのキャリブレーションを開始します。詳しくは、スキャナーのキャリブレーションのページを参照して下さい。
 色のキャリブレーション
- スキャナーの色認識のキャリブレーションを開始します。詳しくは、スキャナーのキャリブレーションのページを参照して下さい。
 確定
確定- 変更内容を確定し、オプションセクションを終了します。


