Interaction
Jump to navigation
Jump to search
Vista Principale
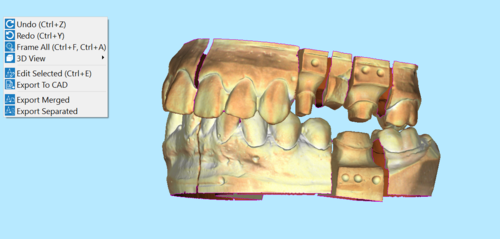
Di seguito viene mostrato un esempio di interazione 3D su una Mesh selezionata in ScanWay.
È possibile interagire con la Vista 3D utilizzando il mouse e la tastiera, il menu contestuale, il menu vista e la barra degli strumenti vista.
Interazione con il Mouse
L'utente può interagire con l'orientamento dell'oggetto 3D attraverso l'uso del mouse o strumenti più specifici che possono essere selezionati nel Menu Contestuale.
Di seguito si riporta la lista delle combinazioni possibili di mouse/tastiera:
 +
+  o
o  +
+  : spostare la telecamera in 2D
 : ruotare liberamente la telecamera intorno all'oggetto 3D
 +
+  : ruotare la telecamera intorno all'asse Y della Vista 3D
 +
+  : ruotare la telecamera intorno all'asse X della Vista 3D
 +
+  : ruotare la telecamera intorno all'asse Z della Vista 3D
 : modificare lo zoom
 : accedere al menu contestuale
 +
+  : modificare la posizione della fonte di luce nella Vista 3D
 : utilizzare lo strumento corrente(es. Selezione Rettangolare, Riempimento Buchi, ecc.)
 +
+  : invertire lo strumento corrente se disponibile (es. deselezionare punti invece di selezionare punti, ecc.)
 + Numero da 1 a 7 : modificare la Vista 3D in una delle posizioni predefinite (es. Frontale, Retro, Sopra, ecc.)
Menu Contestuale e Menu Vista
The view menu and the 3D View context menu contain some tools that can be used to interact with the 3D View.
 Undo (
 + Z)
+ Z) - Cancels the last command and goes back as many times as it is pushed.
 Redo (
 + Y)
+ Y) - Cancels the last undo command and takes the image back as many times as it is pushed.
 Frame All (
 + A / F)
 - the 3D camera will move to show, on the screen, all the current selected 3D Objects.
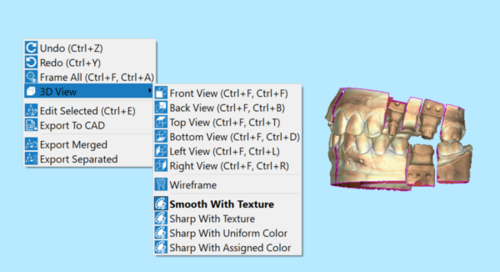
 3DView
- sub-menu to apply default 3D views and options:
 Front View (
  + 1)
+ 1) Back View (
  + 2)
+ 2) Top View (
  + 3)
+ 3) Bottom View (
  + 4)
+ 4) Left View(
  + 5)
+ 5) Right View (
  + 6)
+ 6) Back View (
  + 2)
+ 2) Wireframe: if active allows to see the triangle structure on the selected mesh.
 Show Texture: this option is active by default and it shows the mesh with the acquired colors. To visualize the mesh in a standard color, and not in the actual color of the object, deselect this option.
 Edit Selected (
 + E)
+ E) - Allows to open the edit tools for images or meshes.
 Export to CAD
- Exports the scanned items in STL or OBJ file.
 Export Merged
- Exports the selected files and saves them in one individual STL or OBJ file.
 Export Separated
- Exports the selected files and saves them in separate STL or OBJ files, one for each item.


