Difference between revisions of "NewPrjFree/ja"
Jump to navigation
Jump to search
(Created page with "プロジェクト定義ページの4つ目のアイコンを押すと、フリープロジェクトページが開きます。") |
(Updating to match new version of source page) |
||
| (18 intermediate revisions by one other user not shown) | |||
| Line 5: | Line 5: | ||
{{Screenshot|Newproject_free.png}} | {{Screenshot|Newproject_free.png}} | ||
| − | + | <div class="mw-translate-fuzzy"> | |
| − | * | + | フリープロジェクトでは、その他のプロジェクトとは異なり、ウィザードを使用しません。これにより、ユーザーは制限なしでいつでも任意のアイテムを自由にスキャンすることができます。これは、ユーザーが以下を決定する必要もあることを意味します。 |
| − | * | + | * どのスキャンプロフィールを使って部品をスキャンするか |
| − | * | + | * どの順番で部品をスキャンするか |
| − | * | + | * どのリファレンスに対して、どのように部品をアライメントするか |
| + | * スキャンしたアイテムをどのようにメッシュしてエクスポートするか | ||
| + | </div> | ||
| − | + | エキスパートユーザーの場合、この種類のプロジェクトで時間を節約することができますが、操作に慣れていないユーザーの場合は時間のロスにつながることもあります。 | |
| − | + | このプロジェクトには初期構造がないため、定義の段階ではほとんど何も設定する必要はありません。 | |
{{Screenshot|Free-definition.PNG}} | {{Screenshot|Free-definition.PNG}} | ||
| − | + | 実際にユーザーが入力する必要があるのは、'''一般情報'''のみです。 | |
| − | * | + | * 患者名 |
| − | * | + | * ドクター名(オプション) |
| − | * | + | * メモ(オプション) |
| − | * | + | * リファレンスリムの使用有無を決めるチェックボックス |
| − | + | Doctor(ドクター名)およびNotes(メモ)には自由に入力できます。Patient(患者名)では、以下の選択肢があります。 | |
| − | * | + | *任意の内容を入力する |
| − | * | + | *''Search/Create''(検索/作成)ボタンをクリックして新規プロフィールを作成する |
| − | * | + | *''Search/Create''(検索/作成)ボタンをクリックして既存のプロフィールをデータベースから検索する |
| − | + | '''Search/Create'''(検索/作成)ボタンをクリックすると、以下のウインドウが開きます。 | |
[[File:search.PNG]] | [[File:search.PNG]] | ||
| − | + | <div class="mw-translate-fuzzy"> | |
| + | このウインドウでは、プロジェクトデータベースから既存の患者を検索できます。フィルターを適用することができ、VDDSプロトコルを使用している場合は、検索対象を特定のデータベースに制限することもできます。 | ||
| + | </div> | ||
| − | + | ''Create''(作成)ボタンをクリックすると、以下のウインドウが開きます。 | |
[[File:create_patient.PNG]] | [[File:create_patient.PNG]] | ||
| − | + | 患者作成パネルでは、以下のような患者と治療に関する一般情報を入力できます。 | |
| − | * | + | *患者名 |
| − | * | + | *患者の生年月日 |
| − | * | + | *患者の性別 |
| − | * | + | *ドクター名 |
| − | * | + | *患者の保険情報(該当する場合) |
| − | * | + | *メモ |
| − | + | すべての情報を入力したら、'''Ok'''を選択してデータを確定するか、'''Cancel'''を選択して変更内容を破棄し、プロジェクト定義ページに戻ります。 | |
| − | + | プロジェクトを開始するには、{{Inline button|Ok.png}} ボタンで定義を確定します。 | |
| − | + | <div class="mw-translate-fuzzy"> | |
| + | フリー/エキスパートモードでスキャンする方法について詳しくは、[[ExamplesFree|フリースキャンプロジェクト]]の例のページを参照して下さい。 | ||
| + | </div> | ||
| − | {{Navigation|NewPrjMulti| | + | {{Navigation|NewPrjMulti|NewPrjExpert}} |
Latest revision as of 12:47, 14 May 2018
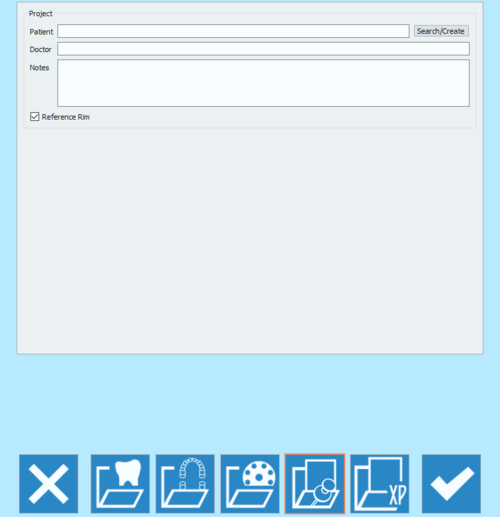
プロジェクト定義ページの4つ目のアイコンを押すと、フリープロジェクトページが開きます。
フリープロジェクトでは、その他のプロジェクトとは異なり、ウィザードを使用しません。これにより、ユーザーは制限なしでいつでも任意のアイテムを自由にスキャンすることができます。これは、ユーザーが以下を決定する必要もあることを意味します。
- どのスキャンプロフィールを使って部品をスキャンするか
- どの順番で部品をスキャンするか
- どのリファレンスに対して、どのように部品をアライメントするか
- スキャンしたアイテムをどのようにメッシュしてエクスポートするか
エキスパートユーザーの場合、この種類のプロジェクトで時間を節約することができますが、操作に慣れていないユーザーの場合は時間のロスにつながることもあります。
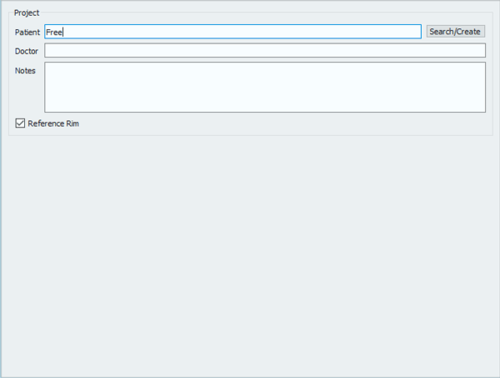
このプロジェクトには初期構造がないため、定義の段階ではほとんど何も設定する必要はありません。
実際にユーザーが入力する必要があるのは、一般情報のみです。
- 患者名
- ドクター名(オプション)
- メモ(オプション)
- リファレンスリムの使用有無を決めるチェックボックス
Doctor(ドクター名)およびNotes(メモ)には自由に入力できます。Patient(患者名)では、以下の選択肢があります。
- 任意の内容を入力する
- Search/Create(検索/作成)ボタンをクリックして新規プロフィールを作成する
- Search/Create(検索/作成)ボタンをクリックして既存のプロフィールをデータベースから検索する
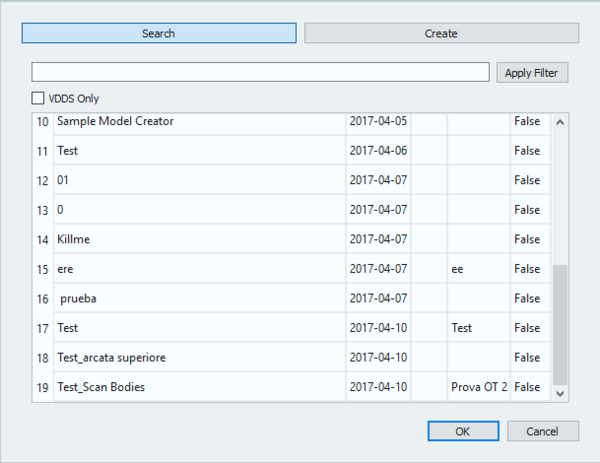
Search/Create(検索/作成)ボタンをクリックすると、以下のウインドウが開きます。
このウインドウでは、プロジェクトデータベースから既存の患者を検索できます。フィルターを適用することができ、VDDSプロトコルを使用している場合は、検索対象を特定のデータベースに制限することもできます。
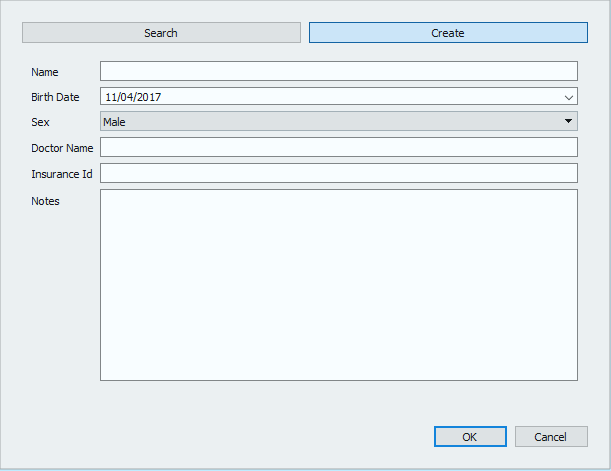
Create(作成)ボタンをクリックすると、以下のウインドウが開きます。
患者作成パネルでは、以下のような患者と治療に関する一般情報を入力できます。
- 患者名
- 患者の生年月日
- 患者の性別
- ドクター名
- 患者の保険情報(該当する場合)
- メモ
すべての情報を入力したら、Okを選択してデータを確定するか、Cancelを選択して変更内容を破棄し、プロジェクト定義ページに戻ります。
フリー/エキスパートモードでスキャンする方法について詳しくは、フリースキャンプロジェクトの例のページを参照して下さい。


