Difference between revisions of "Interaction/en"
Jump to navigation
Jump to search
(Updating to match new version of source page) |
(No difference)
|
Latest revision as of 12:41, 14 May 2018
Main View
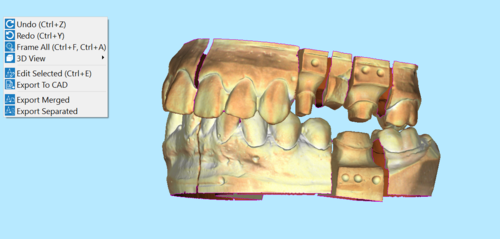
Here below is displayed an example of 3D interaction on a selected Mesh in ScanWay.
It is possible to interact with the 3D View using the mouse and the keyboard, the context menu, the view menu and the view toolbar.
Mouse Interaction
The user can interact with the orientation of the 3D object through either the use of the mouse or more specific tools that can be selected in the Context menu.
Here below, find the list of the provided mouse/keyboard combinations:
 +
+  or
or  +
+  : pan the camera in 2D
 : freely rotate the camera around the 3D Object
 +
+  : rotate the camera restricted to the Y axis of the 3D View
 +
+  : rotate the camera restricted to the X axis of the 3D View
 +
+  : rotate the camera restricted to the Z axis of the 3D View
 : change Zoom
 : enter the context menu
 +
+  : change the position of the light source in the 3D View
 : use the current tool (E.g. Rectangular Selection, Hole Filling, etc.)
 +
+  : invert the current tool if available (E.g. Deselect points instead of Select points, etc.)
 + Number from 1 to 7 : change the 3D View to one of the default positions (E.g. Frontal, Back, Top, etc.)
Context Menu and View Menu
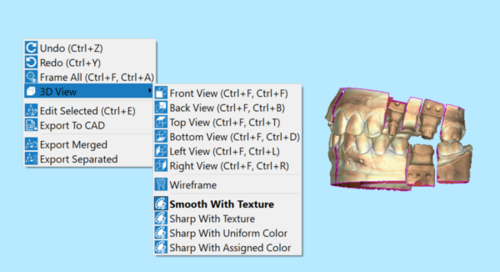
The view menu and the 3D View context menu contain some tools that can be used to interact with the 3D View.
 Undo (
 + Z)
+ Z) - Cancels the last command and goes back as many times as it is pushed.
 Redo (
 + Y)
+ Y) - Cancels the last undo command and takes the image back as many times as it is pushed.
 Frame All (
 + A / F)
 - the 3D camera will move to show, on the screen, all the current selected 3D Objects.
 3DView
- sub-menu to apply default 3D views and options:
 Front View (
  + 1)
+ 1) Back View (
  + 2)
+ 2) Top View (
  + 3)
+ 3) Bottom View (
  + 4)
+ 4) Left View(
  + 5)
+ 5) Right View (
  + 6)
+ 6) Back View (
  + 2)
+ 2) Wireframe: if active allows to see the triangle structure on the selected mesh.
 Smooth With Texture: this option is active by default and it shows the mesh with the acquired colors and smoothed triangle faces.
 Sharp With Texture: this option shows the mesh with the acquired colors and sharp triangle faces, which gives the image a metallic look.
 Sharp With Uniform Color: this option shows the mesh in a pre-established blue color.
 Sharp With Assigned Color: this option shows a different pre-established color for every element of the project.
 Edit Selected (
 + E)
+ E) - Allows to open the edit tools for images or meshes.
 Export to CAD
- Exports the scanned items in STL or OBJ file.
 Export Merged
- Exports the selected files and saves them in one individual STL or OBJ file.
 Export Separated
- Exports the selected files and saves them in separate STL or OBJ files, one for each item.


