Difference between revisions of "ExamplesMultidie/ja"
(Created page with "==Exocadでプロジェクト定義を開始する== このプロジェクトをExocadで作成するには、デスクトップでDentalDBアイコンをクリックしま...") |
(Updating to match new version of source page) |
||
| (28 intermediate revisions by one other user not shown) | |||
| Line 2: | Line 2: | ||
| + | <div class="mw-translate-fuzzy"> | ||
このページでは、同じマルチダイプレートで異なる患者のダイをスキャンする例を、ウィザードに従って説明します。 | このページでは、同じマルチダイプレートで異なる患者のダイをスキャンする例を、ウィザードに従って説明します。 | ||
| + | </div> | ||
==Exocadでプロジェクト定義を開始する== | ==Exocadでプロジェクト定義を開始する== | ||
| Line 8: | Line 10: | ||
このプロジェクトをExocadで作成するには、デスクトップでDentalDBアイコンをクリックします。プロジェクトマネージャーが開きます。'''Multi Die'''(マルチダイ)をクリックして、プロジェクト定義パネルを開きます。 | このプロジェクトをExocadで作成するには、デスクトップでDentalDBアイコンをクリックします。プロジェクトマネージャーが開きます。'''Multi Die'''(マルチダイ)をクリックして、プロジェクト定義パネルを開きます。 | ||
| − | + | Exocadでプロジェクトを作成する方法について詳しくは、[http://wiki.exocad.com/wiki/index.php?title=DentalDB_Module Exocad Wiki!]を参照して下さい。 | |
| − | + | 今回のデモ用プロジェクトでは以下の通りプロジェクトを定義します。 | |
[[File:prj-exo-multidie.gif]] | [[File:prj-exo-multidie.gif]] | ||
| − | + | プロジェクトの定義が完了したら、Actions(アクション)セクションの'''OPT'''をクリックして、スキャンソフトウェアを起動します。 | |
| − | + | スキャンソフトウェアでは、Exocadで作成されたプロジェクトが最初に表示されます。プロジェクトが正しく定義されている場合は、確定ボタン {{Inline button|ok.png}} をクリックします。 | |
[[File:multidie-prj-check.gif]] | [[File:multidie-prj-check.gif]] | ||
| − | == | + | ==ScanWayでプロジェクト定義を開始する== |
| − | + | すべてのプロジェクトは、後で設計に使用するCADにかかわらず、スキャンソフトウェアでも定義できます。 | |
| − | + | デスクトップのScanWayアイコンをダブルクリックして、スキャンソフトウェアを起動します。[[Splash|ようこそページ]]が開きます。プロジェクトを作成するには、最初のアイコンをクリックします。 | |
{{Screenshot|NewPrjIcon.png}} | {{Screenshot|NewPrjIcon.png}} | ||
| − | + | プロジェクトの定義方法について詳しくは、[[NewPrj|新規プロジェクトの作成]]のページを参照して下さい。 | |
| − | + | 今回のデモ用プロジェクトでは以下の通り定義します。 | |
[[File:prj-definition-multidie.gif]] | [[File:prj-definition-multidie.gif]] | ||
| − | + | どちらの方法でプロジェクトを定義しても、同じウィザードに進みます。ここからは、このウィザードに従っていきます。 | |
| − | == | + | ==ステップ1: マルチダイスキャン== |
| − | + | <div class="mw-translate-fuzzy"> | |
| + | これは、この種類のプロジェクトで実行する唯一のスキャンステップです。通常通り、このスキャンステップには2つのサブステップがあります。 | ||
| + | </div> | ||
| − | === | + | ===スキャンステップ=== |
| − | + | <div class="mw-translate-fuzzy"> | |
| + | スキャナーの指示に従いマルチダイプレートにダイを置き、'''スキャンボタン'''{{Inline button|scanAction.png}} をクリックします。スキャンが終了すると、結果が表示されます。 | ||
| + | </div> | ||
[[File:multidieprj-scan-steps.png]] | [[File:multidieprj-scan-steps.png]] | ||
| − | + | <div class="mw-translate-fuzzy"> | |
| + | このスキャンはリファレンスリムを使って実行します。ユーザーがモデル、ダイ、またはマーカーのスキャンを起動する際、ソフトウェアでリファレンスリムが使用されていないことが検出されると、以下のメッセージが表示されます。 | ||
| + | </div> | ||
{{Screenshot|msg_rr.png}} | {{Screenshot|msg_rr.png}} | ||
| − | + | <div class="mw-translate-fuzzy"> | |
| + | ユーザーは、スキャンをキャンセルしてモデルホルダーにリファレンスリムを設置し、新しいスキャンを開始するか、リファレンスリムなしでスキャンを続行するかを決めることができます。リファレンスリムについて詳しくは、[[Accessories|付属品]]のページを参照して下さい。 | ||
| + | </div> | ||
| − | + | {{Inline button|nextAction.png}} をクリックして、2つ目のステップに進みます。 | |
| − | === | + | ===編集ステップ=== |
| − | + | <div class="mw-translate-fuzzy"> | |
| + | このステップでは、取得した画像を編集できます。このステップで利用できるオプションについて詳しくは、[[Edit|編集ツール]]のページを参照して下さい。 | ||
| + | </div> | ||
| − | + | この段階の画像は編集したりトリミングしたりできます。このケースでは、さまざまなツールが使用されています。 | |
[[File: edit-multidieprj.gif]] | [[File: edit-multidieprj.gif]] | ||
| − | + | 適切な結果が取得できたら、{{Inline button|nextAction.png}} をクリックして次の手順に進みます。 | |
| − | == | + | ==ステップ6: メッシュ生成およびエクスポート== |
| − | + | <div class="mw-translate-fuzzy"> | |
| + | この時点で、ソフトウェアは自動的にメッシュ生成を開始します。メッシュは編集したり、個別にエクスポートしたり、画像としてエクスポートしたりできます。メッシュの編集について詳しくは、[[Mesh|メッシュツール]]のページを参照して下さい。 | ||
| + | </div> | ||
| − | + | エクスポートボタン {{Inline button|exportToCadAction.png}} をクリックして、CADにエクスポートします。 | |
{{Screenshot|mesh-gen-multi.png}} | {{Screenshot|mesh-gen-multi.png}} | ||
| − | + | <div class="mw-translate-fuzzy"> | |
| + | プロジェクトをExocadから開始した場合、CADが自動的に開き、すぐに設計を始めることができます。それ以外の場合は、ファイルをエクスポートする方法を選択するよう求められます。 | ||
| + | </div> | ||
{{Navigation|ExamplesFullJ|ExamplesFree}} | {{Navigation|ExamplesFullJ|ExamplesFree}} | ||
Latest revision as of 15:30, 1 June 2018
このページでは、同じマルチダイプレートで異なる患者のダイをスキャンする例を、ウィザードに従って説明します。
Contents
Exocadでプロジェクト定義を開始する
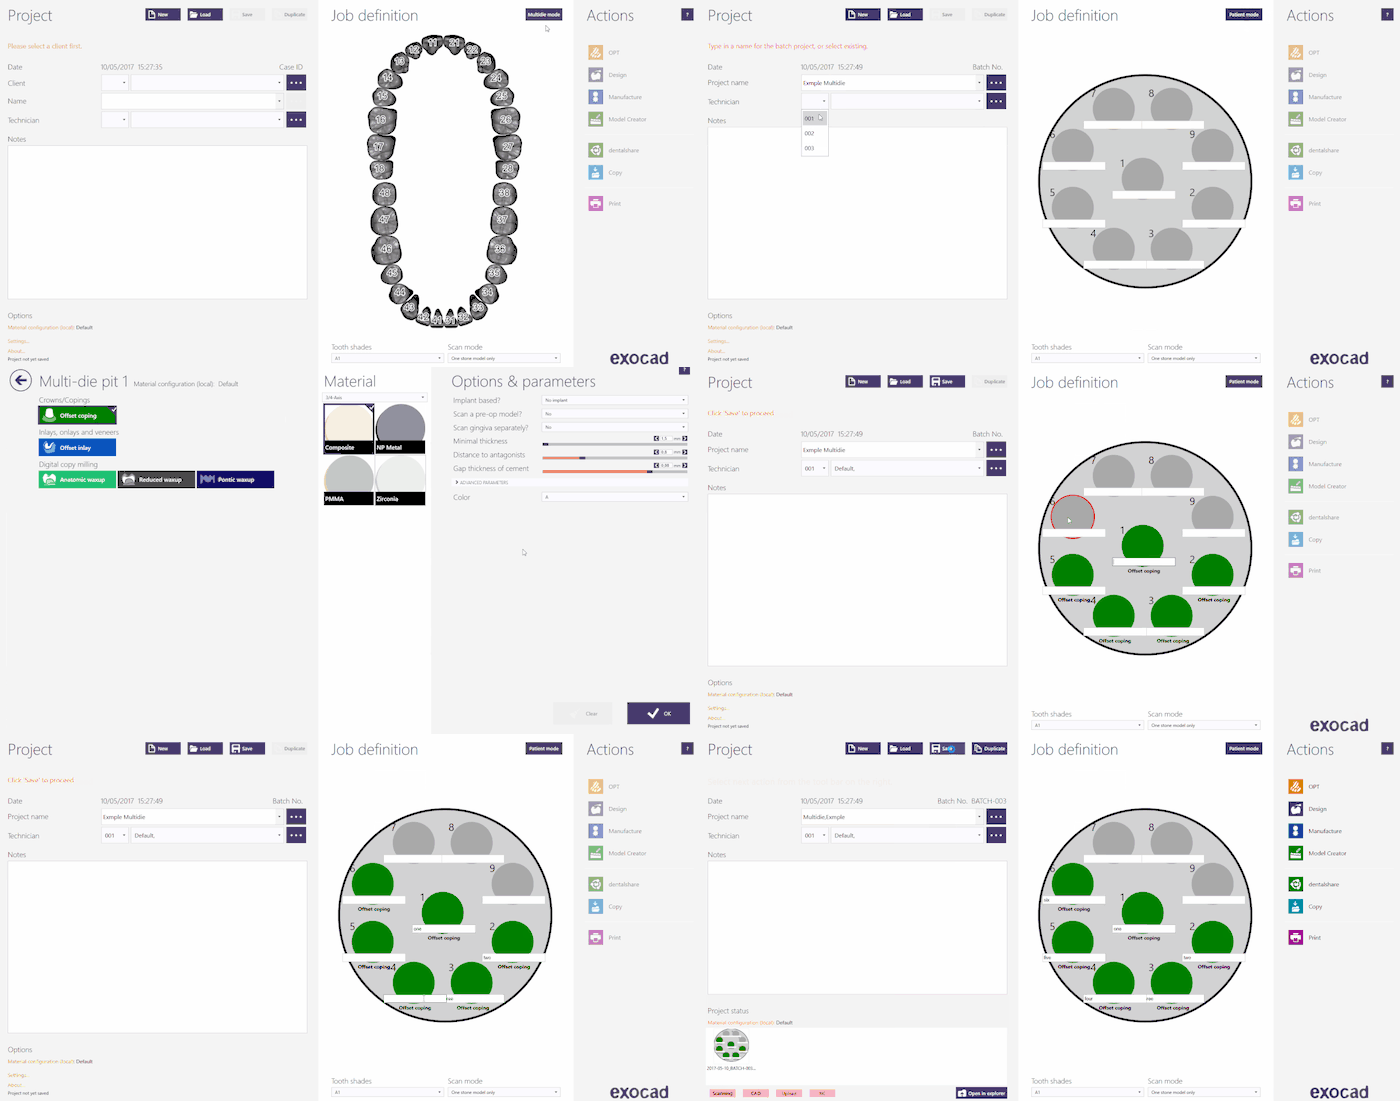
このプロジェクトをExocadで作成するには、デスクトップでDentalDBアイコンをクリックします。プロジェクトマネージャーが開きます。Multi Die(マルチダイ)をクリックして、プロジェクト定義パネルを開きます。
Exocadでプロジェクトを作成する方法について詳しくは、Exocad Wiki!を参照して下さい。
今回のデモ用プロジェクトでは以下の通りプロジェクトを定義します。
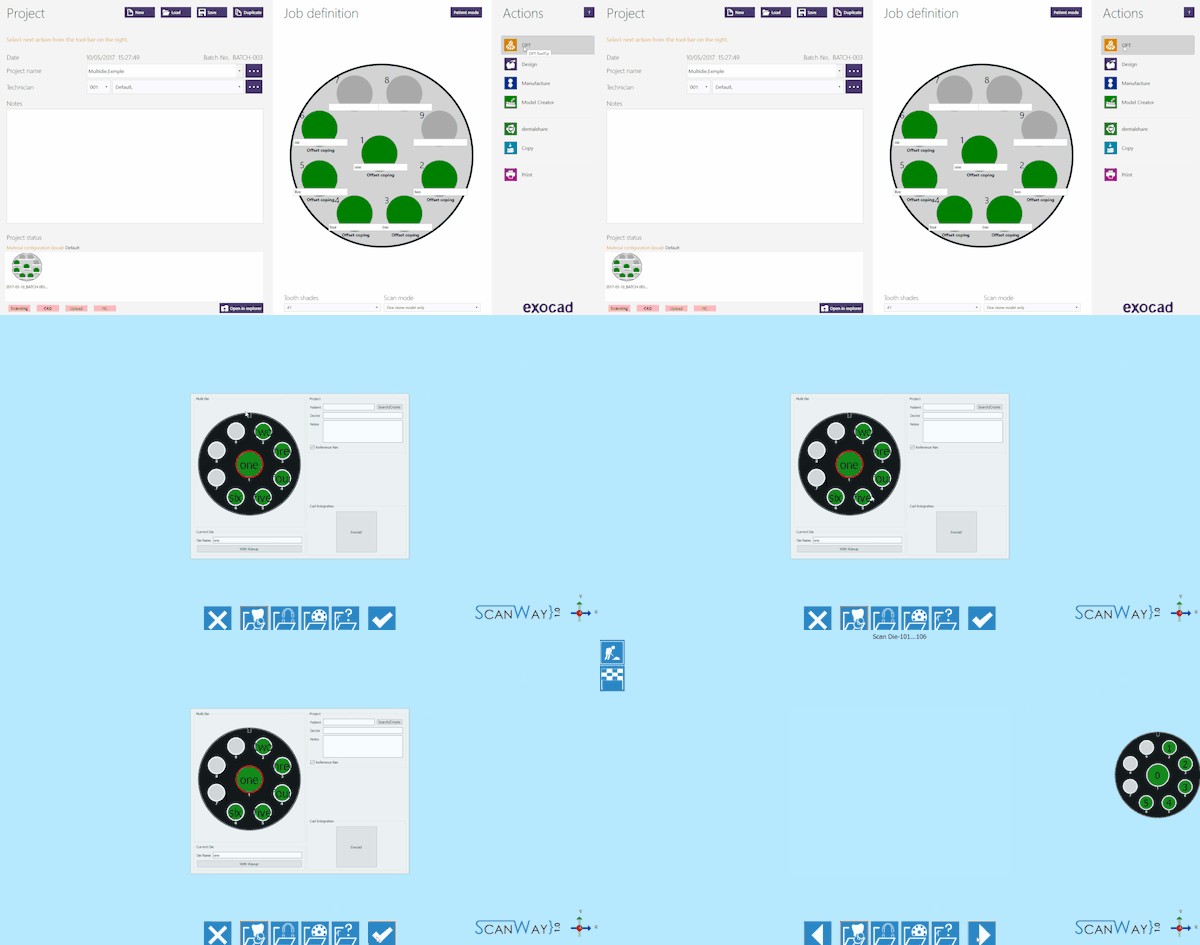
プロジェクトの定義が完了したら、Actions(アクション)セクションのOPTをクリックして、スキャンソフトウェアを起動します。
スキャンソフトウェアでは、Exocadで作成されたプロジェクトが最初に表示されます。プロジェクトが正しく定義されている場合は、確定ボタン ![]() をクリックします。
をクリックします。
ScanWayでプロジェクト定義を開始する
すべてのプロジェクトは、後で設計に使用するCADにかかわらず、スキャンソフトウェアでも定義できます。
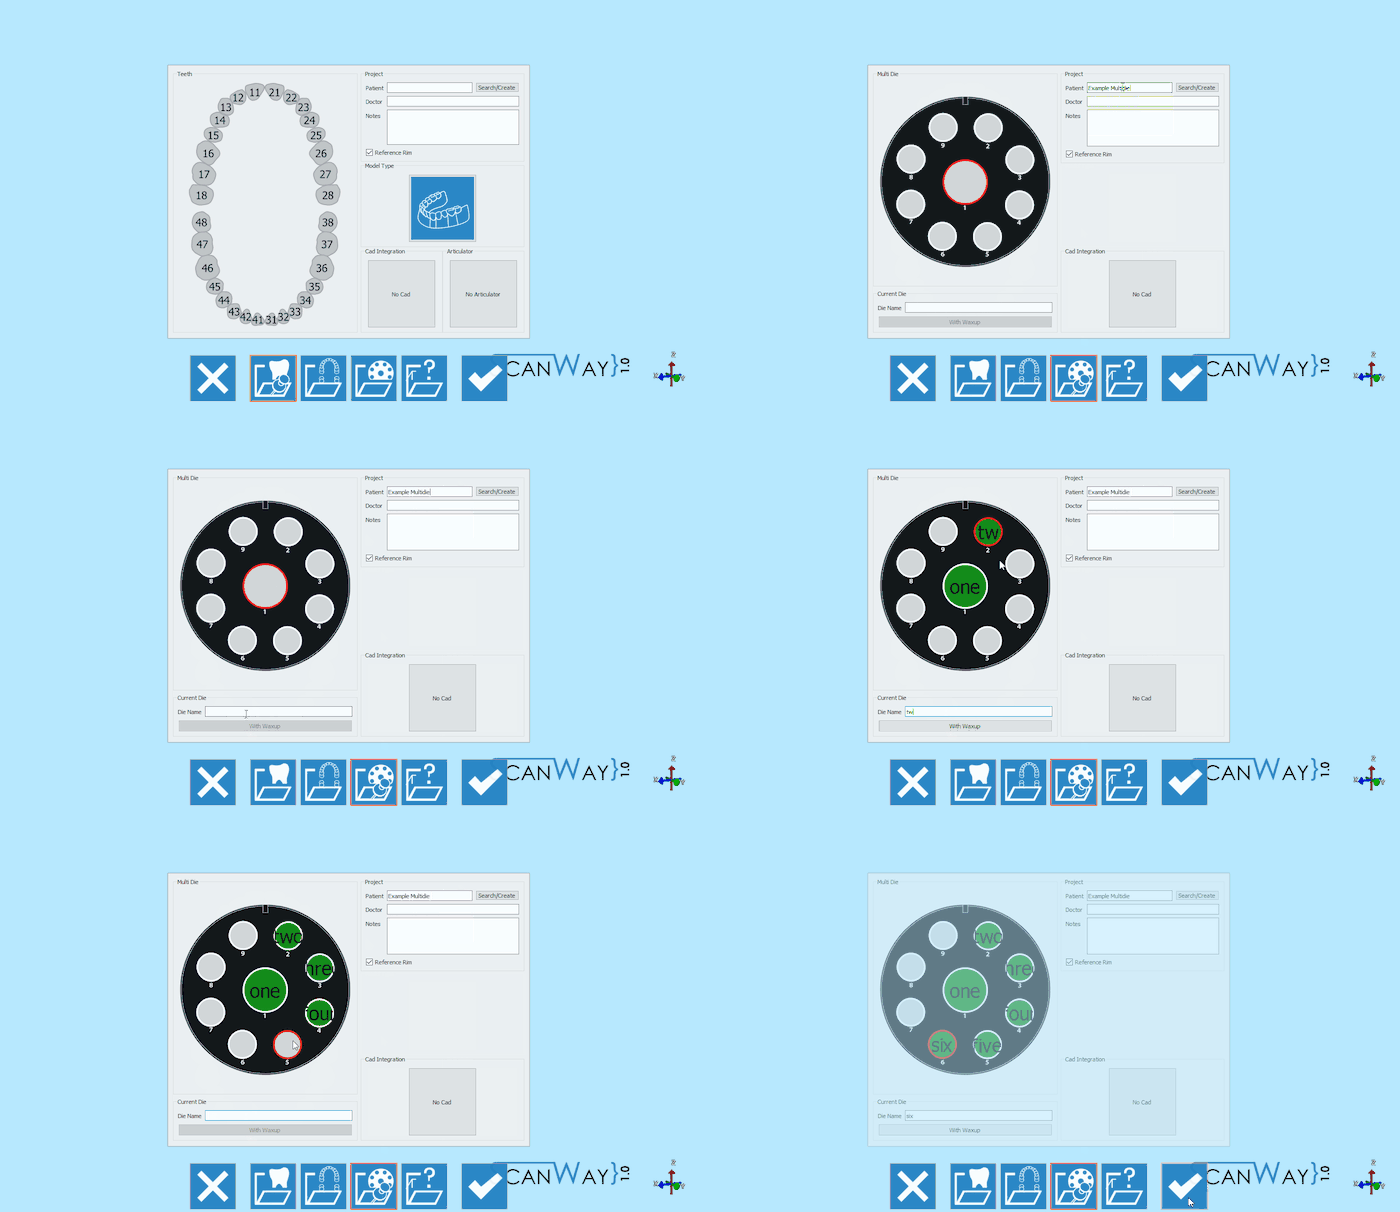
デスクトップのScanWayアイコンをダブルクリックして、スキャンソフトウェアを起動します。ようこそページが開きます。プロジェクトを作成するには、最初のアイコンをクリックします。
プロジェクトの定義方法について詳しくは、新規プロジェクトの作成のページを参照して下さい。
今回のデモ用プロジェクトでは以下の通り定義します。
どちらの方法でプロジェクトを定義しても、同じウィザードに進みます。ここからは、このウィザードに従っていきます。
ステップ1: マルチダイスキャン
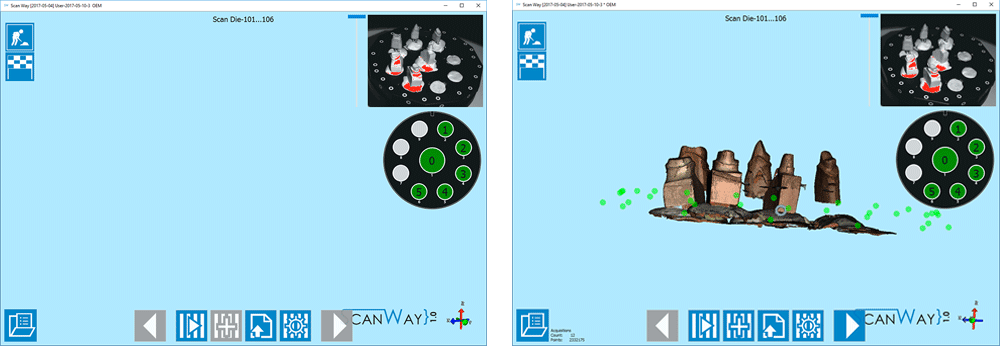
これは、この種類のプロジェクトで実行する唯一のスキャンステップです。通常通り、このスキャンステップには2つのサブステップがあります。
スキャンステップ
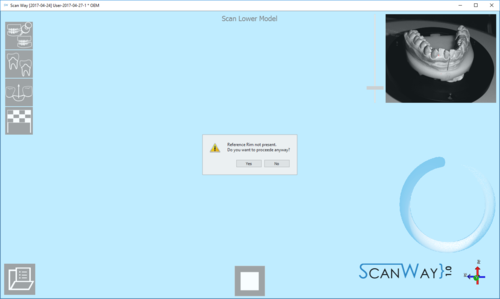
このスキャンはリファレンスリムを使って実行します。ユーザーがモデル、ダイ、またはマーカーのスキャンを起動する際、ソフトウェアでリファレンスリムが使用されていないことが検出されると、以下のメッセージが表示されます。
ユーザーは、スキャンをキャンセルしてモデルホルダーにリファレンスリムを設置し、新しいスキャンを開始するか、リファレンスリムなしでスキャンを続行するかを決めることができます。リファレンスリムについて詳しくは、付属品のページを参照して下さい。
編集ステップ
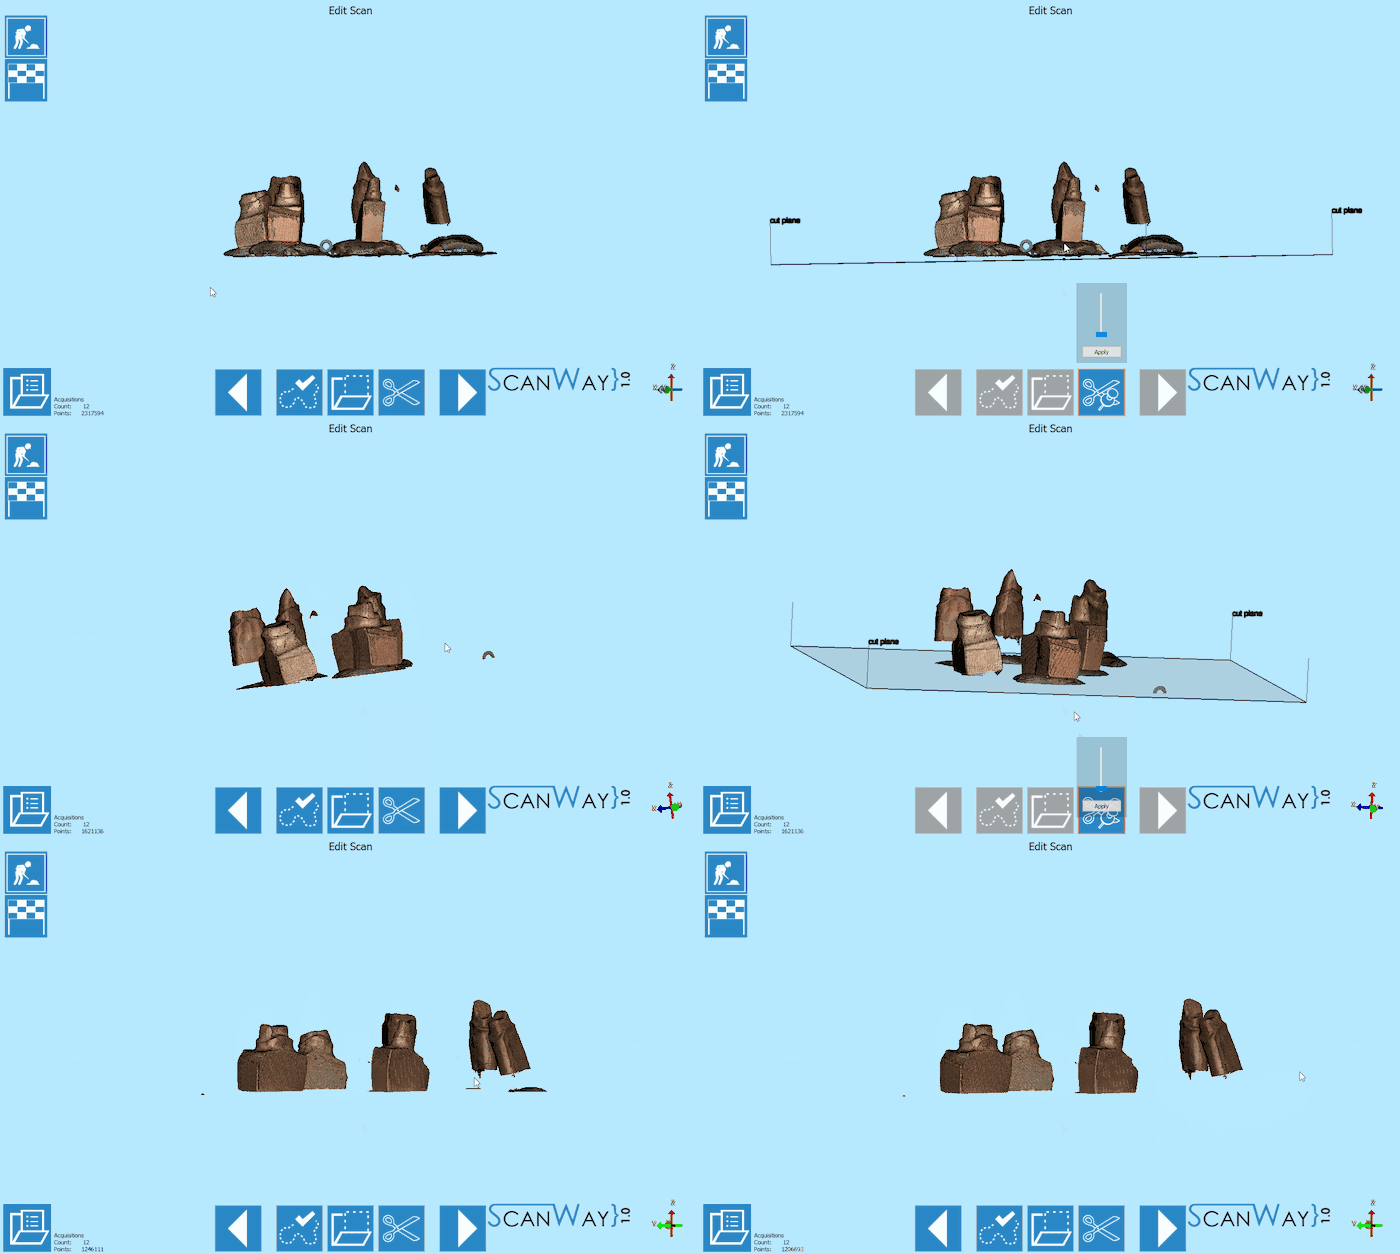
このステップでは、取得した画像を編集できます。このステップで利用できるオプションについて詳しくは、編集ツールのページを参照して下さい。
この段階の画像は編集したりトリミングしたりできます。このケースでは、さまざまなツールが使用されています。
適切な結果が取得できたら、![]() をクリックして次の手順に進みます。
をクリックして次の手順に進みます。
ステップ6: メッシュ生成およびエクスポート
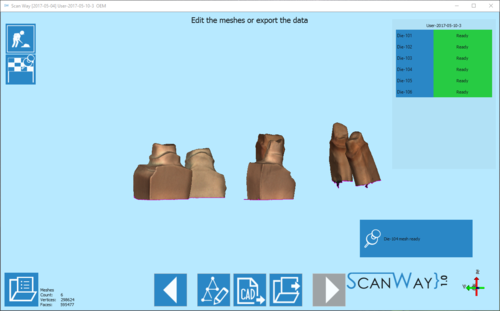
この時点で、ソフトウェアは自動的にメッシュ生成を開始します。メッシュは編集したり、個別にエクスポートしたり、画像としてエクスポートしたりできます。メッシュの編集について詳しくは、メッシュツールのページを参照して下さい。
エクスポートボタン ![]() をクリックして、CADにエクスポートします。
をクリックして、CADにエクスポートします。
プロジェクトをExocadから開始した場合、CADが自動的に開き、すぐに設計を始めることができます。それ以外の場合は、ファイルをエクスポートする方法を選択するよう求められます。
