Difference between revisions of "ExamplesDynamic"
(Created page with "{{DISPLAYTITLE:Example: Dynamic Articulator Module|noerror}} <translate> In this page will be followed and explained the wizard for scanning 2 models in occlusion with 3 dies...") |
|||
| Line 8: | Line 8: | ||
When the '''Dynamic Articultion Module''' gets enabled, the user is provided with a set of 4 ''Mounting Plates'' and a ''Recalibration Object''. See [[Accessories|Accessories- Dynamic Articulation Module]]. | When the '''Dynamic Articultion Module''' gets enabled, the user is provided with a set of 4 ''Mounting Plates'' and a ''Recalibration Object''. See [[Accessories|Accessories- Dynamic Articulation Module]]. | ||
| − | Before using the Module for the first time it is necessary to calibrate the axis of the scanner to work accordingly to the occlusion simulation. Learn | + | Before using the Module for the first time it is necessary to calibrate the axis of the scanner to work accordingly to the occlusion simulation. Learn how to calibrate at the page [[Calibrations|Calibrate your scanner]]. |
'''THIS IS AN ADDITIONAL OPEN TECHNOLOGIES LICENSE MODULE: ASK YOUR DEALER HOW TO GET IT!!''' | '''THIS IS AN ADDITIONAL OPEN TECHNOLOGIES LICENSE MODULE: ASK YOUR DEALER HOW TO GET IT!!''' | ||
| + | ==Project definition starting from Exocad== | ||
| + | |||
| + | To create this project in Exocad, click on the DentalDB icon in your desktop. The project manager will open. | ||
| + | Fill in the project information, the kind of restoration that needs to be designed and the extra parameters. For this kind of project make sure that the '''Scan Mode''' is set on one of the available virtual Articulators of Exocad; choose between: | ||
| + | |||
| + | *'''Two stone models in Articulator A''' for Artex | ||
| + | *'''Two stone models in Articulator S''' for Sam or Adesso | ||
| + | *'''Two stone models in Articulator P''' for Protarevo- Kavo | ||
| + | *'''Two stone models in Articulator B''' for Bioart's A7 | ||
| + | *'''Two stone models in Articulator D''' for Denar by Whipmix | ||
| + | |||
| + | For further information on how to create projects in Exocad, visit the specific page on the [http://wiki.exocad.com/wiki/index.php?title=DentalDB_Module Exocad Wiki!] | ||
| + | |||
| + | Here is the project definition for our demo project; we have used the Articulator Protarevo by Kavo: | ||
| + | |||
| + | [[File:prj-exo-dynamic.gif]] | ||
| + | |||
| + | Once the project has been defined just click '''OPT''' in the Actions section to launch the scanning software. <br />The first thing the scanning software shows is the project created in Exocad. Check if the articualtor selection is correct, if so click the Accept Button {{Inline button|ok.png}}. | ||
| + | |||
| + | [[File:prj-check-dynamic.gif]] | ||
| + | |||
| + | ==Project definition starting from ScanWay== | ||
| + | |||
| + | All projects can be defined in the scanning software as well, regardless the CAD that will be later on used to design. | ||
| + | |||
| + | Launch the scanning software double-clicking on the ScanWay icon on your desktop. The [[Splash|Welcome Page]] will open; to create the project click on the first icon. | ||
| + | |||
| + | {{Screenshot|NewPrjIcon.png}} | ||
| + | |||
| + | For detailed information on how to define a project visit the specific page: [[NewPrj|Create a New Project]]. | ||
| + | |||
| + | For this project, take particular care in the articulator selection. If the articulator gets wrongly defined, the virtual articulation won't be realistic and useful.<br />Also, remeber to set Exocad as Cad platmfrom, since this module is specifically designed to work for Exocad's Virtual Articulator. | ||
| + | |||
| + | Here is the definition of our demo project: | ||
| + | |||
| + | [[File:prj-definition.dynamic.gif]] | ||
| + | |||
| + | Both the project definitions described lead to the same wizard, which will be now followed step by step. | ||
| + | |||
| + | ==Step 1: Articulator Scanning== | ||
| + | |||
| + | The first step of any project that as been set to have both jaws, is the Articulator Scan. | ||
| + | |||
| + | In this specific case the Articulator has to be scanned. The scanned articulator needs to match the one selected in the project defintion. | ||
</translate> | </translate> | ||
{{Navigation|ExamplesImplants|ExamplesDynamic}} | {{Navigation|ExamplesImplants|ExamplesDynamic}} | ||
Revision as of 09:34, 8 May 2017
In this page will be followed and explained the wizard for scanning 2 models in occlusion with 3 dies (2 upper and 1 lower) using Open Technologies' Dynamic Articulation Module.
The Dynamic Articulation Module allows the user to transfer the mastication position realized in the laboratory with a real articulator into its Exocad virtual equivalent. The available articulators in Exocad, for which we can provide the exact positioning are Artex, Protarevo Kavo, Sam, Bioart A7 and Denar by Whipmix.
When the Dynamic Articultion Module gets enabled, the user is provided with a set of 4 Mounting Plates and a Recalibration Object. See Accessories- Dynamic Articulation Module.
Before using the Module for the first time it is necessary to calibrate the axis of the scanner to work accordingly to the occlusion simulation. Learn how to calibrate at the page Calibrate your scanner.
THIS IS AN ADDITIONAL OPEN TECHNOLOGIES LICENSE MODULE: ASK YOUR DEALER HOW TO GET IT!!
Project definition starting from Exocad
To create this project in Exocad, click on the DentalDB icon in your desktop. The project manager will open.
Fill in the project information, the kind of restoration that needs to be designed and the extra parameters. For this kind of project make sure that the Scan Mode is set on one of the available virtual Articulators of Exocad; choose between:
- Two stone models in Articulator A for Artex
- Two stone models in Articulator S for Sam or Adesso
- Two stone models in Articulator P for Protarevo- Kavo
- Two stone models in Articulator B for Bioart's A7
- Two stone models in Articulator D for Denar by Whipmix
For further information on how to create projects in Exocad, visit the specific page on the Exocad Wiki!
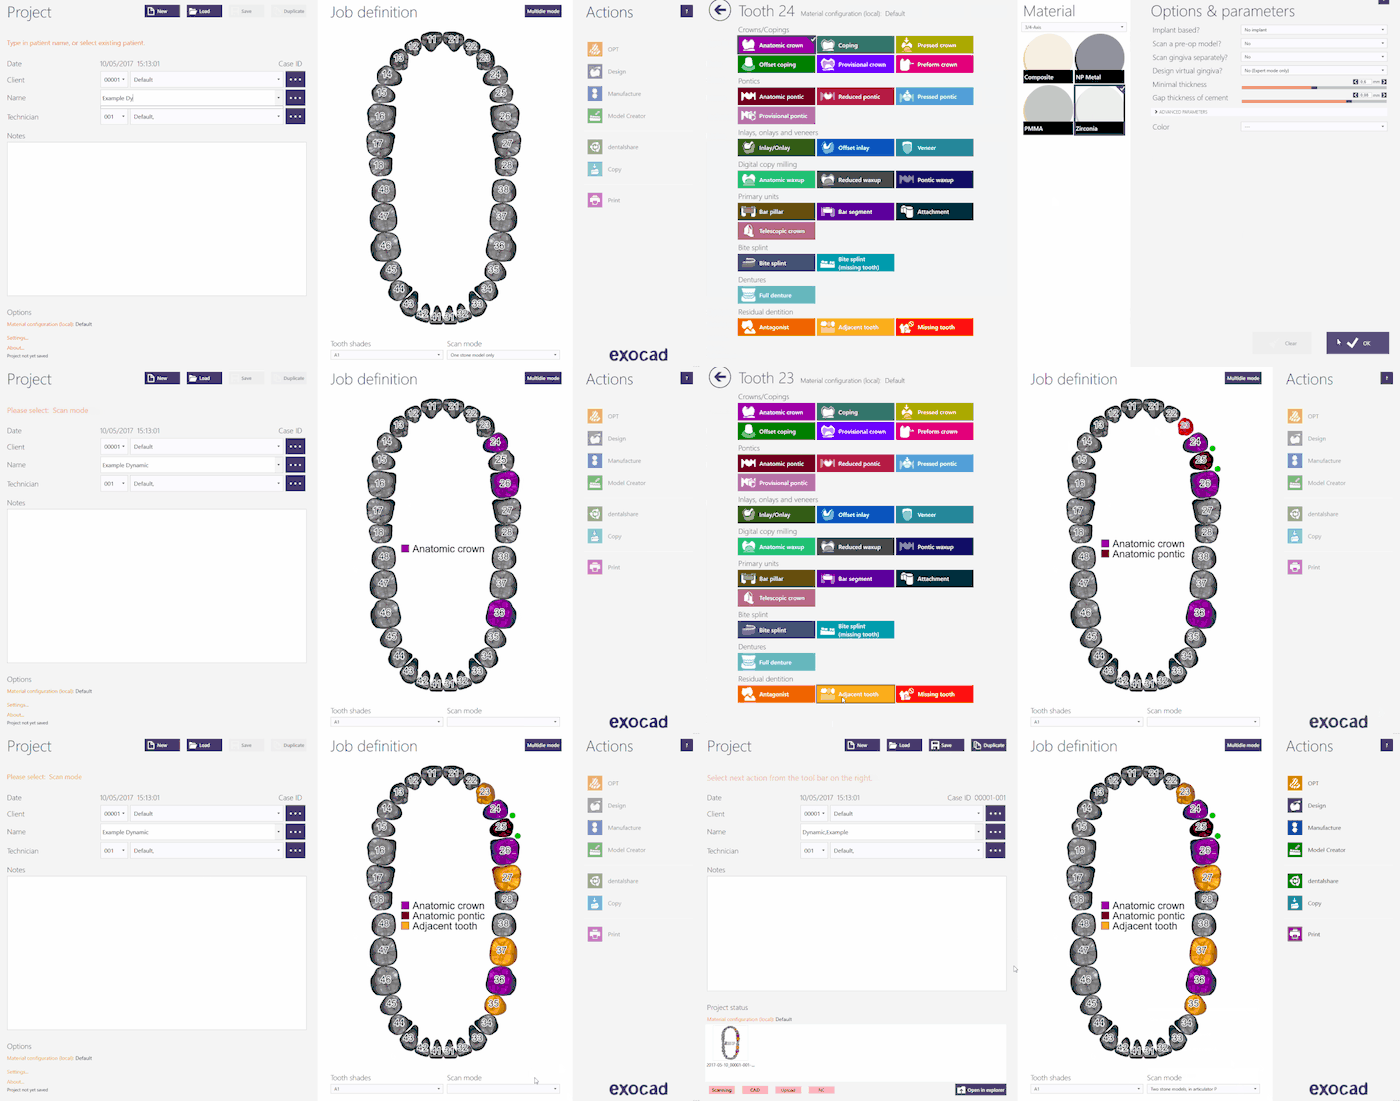
Here is the project definition for our demo project; we have used the Articulator Protarevo by Kavo:
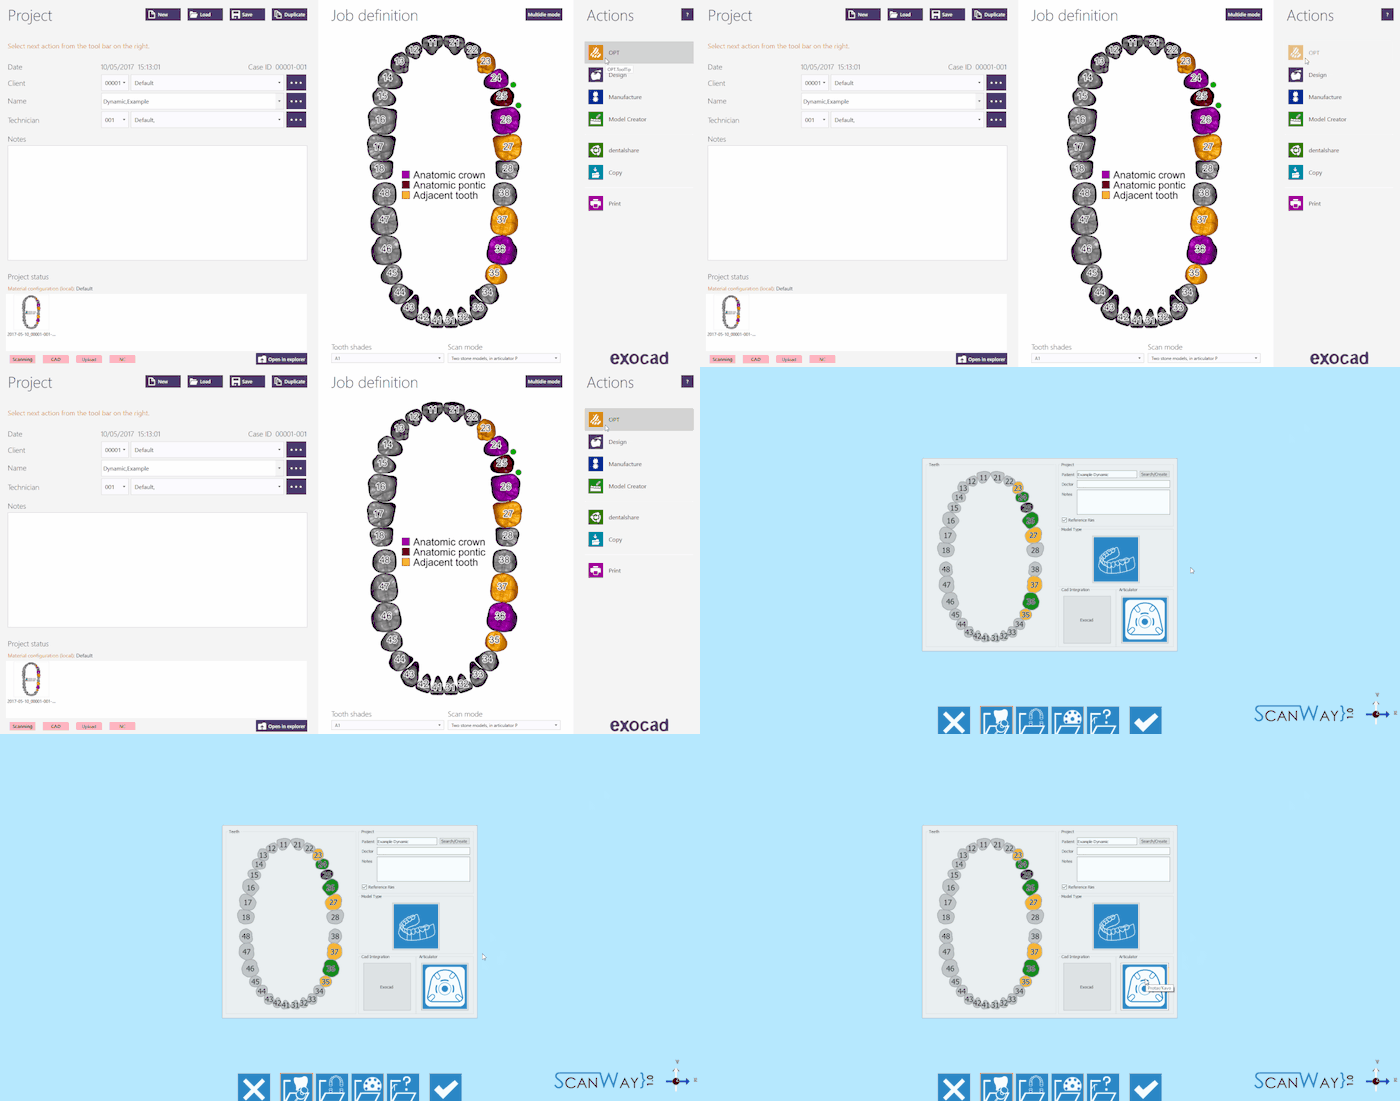
Once the project has been defined just click OPT in the Actions section to launch the scanning software.
The first thing the scanning software shows is the project created in Exocad. Check if the articualtor selection is correct, if so click the Accept Button ![]() .
.
Project definition starting from ScanWay
All projects can be defined in the scanning software as well, regardless the CAD that will be later on used to design.
Launch the scanning software double-clicking on the ScanWay icon on your desktop. The Welcome Page will open; to create the project click on the first icon.
For detailed information on how to define a project visit the specific page: Create a New Project.
For this project, take particular care in the articulator selection. If the articulator gets wrongly defined, the virtual articulation won't be realistic and useful.
Also, remeber to set Exocad as Cad platmfrom, since this module is specifically designed to work for Exocad's Virtual Articulator.
Here is the definition of our demo project:
File:Prj-definition.dynamic.gif
Both the project definitions described lead to the same wizard, which will be now followed step by step.
Step 1: Articulator Scanning
The first step of any project that as been set to have both jaws, is the Articulator Scan.
In this specific case the Articulator has to be scanned. The scanned articulator needs to match the one selected in the project defintion.


